Actions
What are Actions?
There are a number of installation tasks that are common to many installers, such as changing file permissions, substituting a value in a file, and so on. InstallBuilder includes a large number of useful built-in actions for these purposes.
You can add new actions by manually editing the XML project file directly or in the Advanced section of the GUI building tool. Actions are either attached to a particular folder tag in the project file (<actionList>) that will be executed after the contents of the folder have been installed, or can be part of specific action lists that are executed at specific points during installation.
Actions usually take one or more arguments. If one of those arguments is a file matching expression (<files>) and the action was included in a <folder> action list, the matching will also occur against the contents of the folder:
<folder>
  <name>binaries</name>
  ...
  <destination>${installdir}</destination>
   <distributionFileList>
       <distributionDirectory>
          <origin>/some/path/to/bin</origin>
       </distributionDirectory>
   </distributionFileList>
  <actionList>
     <changePermissions permissions="0755" files="*"/>
  </actionList>
</folder>
In the example above, although the <changePermissions> action is not recursive, as it was executed inside a <folder> action list, the pattern will be recursively matched against all of the files contained in the bin directory. Alternatively, you could use the <postInstallationActionList> to change the permissions, but at that point the <changePermissions> action won’t execute recursively and you will need to provide a more complex pattern:
<folder>
  <name>binaries</name>
  ...
  <destination>${installdir}</destination>
   <distributionFileList>
       <distributionDirectory>
          <origin>/some/path/to/bin</origin>
       </distributionDirectory>
   </distributionFileList>
</folder>
...
<postInstallationActionList>
   <!-- Multi-level pattern so child files from sublevel 0 to 4 are considered -->
   <changePermissions permissions="0755" files="${installdir}/bin/{*,*/*,*/*/*,*/*/*/*}"/>
</postInstallationActionList>
In addition, if the arguments contain references to installer variables, such as the installation directory, they will be properly expanded before the action is executed.
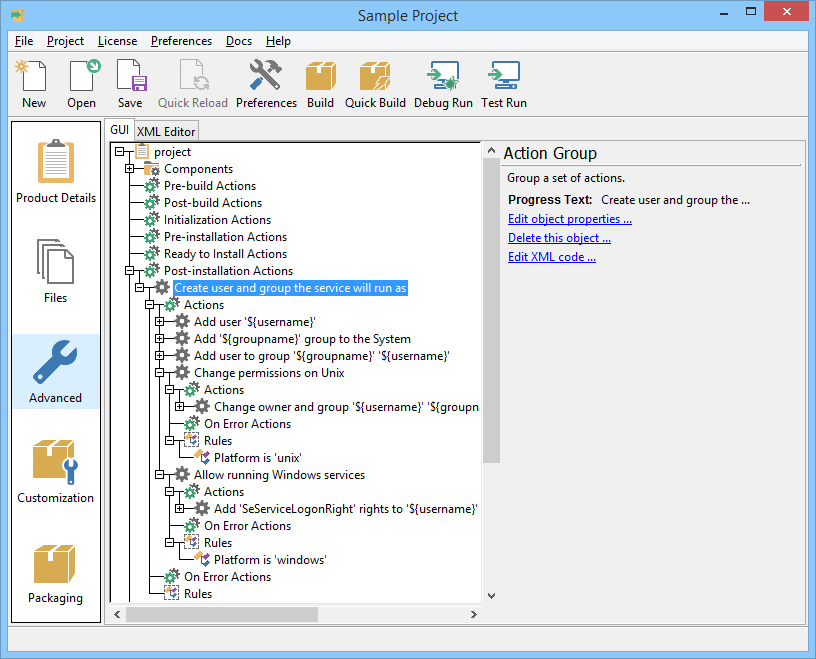
Showing the Progress Text in Builder GUI
Complex InstallBuilder projects often consist of multiple <actionGroup> items that contain actions, which may be difficult to manage.
The GUI building tool allows showing the <actionGroup>'s <progressText> in the GUI instead of the action type.
To do this, simply open the Preferences dialog and enable the Show Progress Text in GUI option, such as:
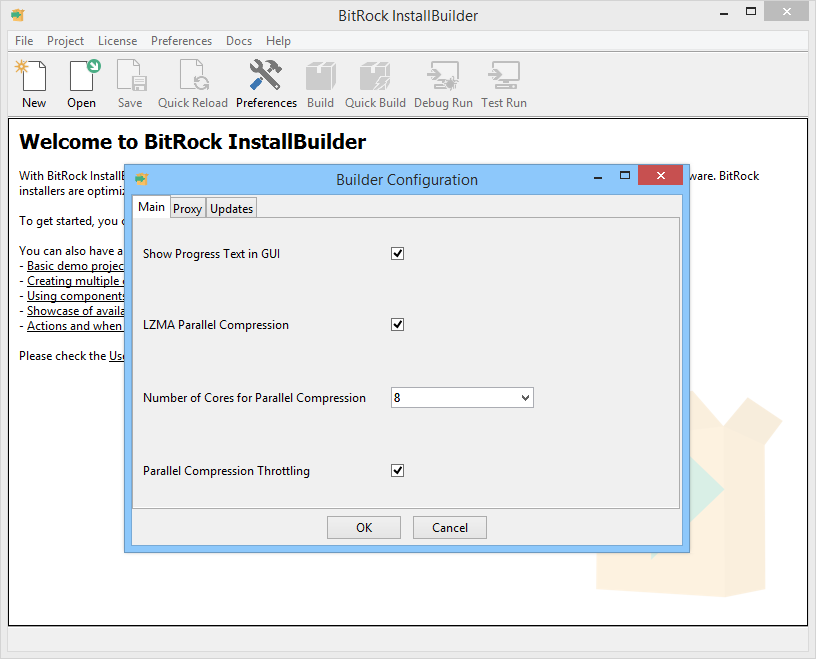
After enabling it, all <actionGroup> elements that have their <progressText> set will show it in the action list tree:
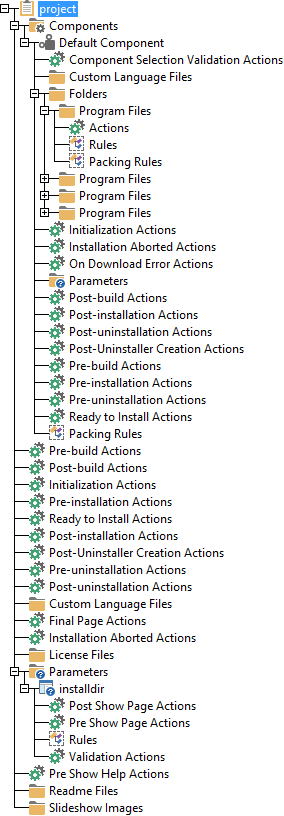
Action Lists
InstallBuilder actions are organized in what are called action lists, which are executed at specific points of the installation process. It is important to understand how and when each action must be performed, what differences exist between action lists inside components and within the primary installer, how the installer will behave when you run it in different installation modes (GUI, text, or unattended) and what happens when you generate rpm or deb packages.
You can place your action lists in the main installer project or in one of its components. Figure 43 shows all the available action lists in the GUI:
Building the Installer
-
Pre-build Actions - <preBuildActionList>: Executes before generating the installer file. These actions usually include setting environment variables or performing some type of processing on the files that will go into the installer before they are packed into it. For multi-platform CDROM installers, the preBuildActionList is executed once at the beginning of the CDROM build, and then again for every one of the specific platform installers.
-
Post-build Actions - <postBuildActionList>: Executes after generating the installer file. These actions are usually useful to reverse any changes made to the files during the preBuildActionList or to perform additional actions on the generated installer, such as signing it by invoking an external tool. For multi-platform CDROM installers, the postBuildActionList is executed once for every one of the specific platform installers and one final time for the whole CDROM build.
Help Menu
-
Pre Show Help Actions - <preShowHelpActionList>: Executes before help information is displayed. The help is displayed when the
--helpcommand line option is passed to an installer. It can be useful for example for modifying the description of parameters based on the system the installer is running on. On Windows, the help menu will show as a GUI popup window that will auto-close after one minute.
Sample Project 1.0
Usage:

 --help                                      Display the list of valid options

 --version                                   Display product information

 --unattendedmodeui <unattendedmodeui>       Unattended Mode UI
                                             Default: none
                                             Allowed: none minimal minimalWithDialogs

 --optionfile <optionfile>                   Installation option file
                                             Default:

 --debuglevel <debuglevel>                   Debug information level of verbosity
                                             Default: 2
                                             Allowed: 0 1 2 3 4

 --mode <mode>                               Installation mode
                                             Default: gtk
                                             Allowed: gtk xwindow text unattended

 --debugtrace <debugtrace>                   Debug filename
                                             Default:

 --enable-components <enable-components>     Comma-separated list of components
                                             Default: default
                                             Allowed: default

 --disable-components <disable-components>   Comma-separated list of components
                                             Default:
                                             Allowed: default

 --installer-language <installer-language>   Language selection
                                             Default: en
                                             Allowed: sq ar es_AR az eu pt_BR bg ca hr cs da nl en et fi fr de el he hu id it ja kk ko lv lt no fa pl pt ro ru sr zh_CN sk sl es sv th zh_TW tr tk uk va vi cy

 --prefix <prefix>                           Installation Directory
                                             Default: /home/user/sample-1.0
Installation Process
-
Splash Screen: After the installer internal initialization, the Splash Screen is displayed. The duration of this event is configured through the
<splashScreenDelay>property or can be skipped if it was disabled setting<disableSplashScreen>1</disableSplashScreen>

-
Initialization Actions - <initializationActionList>: Executes when the installer has started, just before the parsing of the command line options.
-
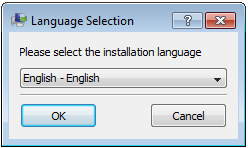
Language Selection: If
<allowLanguageSelection>is set to1and no language was provided through the command line, the language selection dialog will be displayed, allowing your users to select one of the allowed languages defined in the<allowedLanguages>tag.
-
Pre-installation Actions - <preInstallationActionList>: Executes before the first page of the installer is displayed, right after the parsing of the command line options takes place. It is commonly used for detecting a Java (tm) Runtime Environment or for setting user-defined installer variables that will be used later on:
<preInstallationActionList>
   <setInstallerVariable>
     <name>installdir</name>
     <value>${env(SYSTEMDRIVE)}/${project.shortName}</value>
     <ruleList>
        <platformTest type="windows"/>
     </ruleList>
   </setInstallerVariable>
   <setInstallerVariable>
     <name>installdir</name>
     <value>/usr/local/${project.shortName}</value>
     <ruleList>
        <platformTest type="linux"/>
     </ruleList>
   </setInstallerVariable>
</preInstallationActionList>-
Component Selection
-
Component Selection Validation Actions - <componentSelectionValidationActionList>: Executes after the component page is displayed to check that the selected components are a valid combination.
-
Parameter Pages
Each parameter has three 3 different action lists: validationActionList, preShowPageActionList and postShowPageActionList. Note that those actions are not executed if the installer is executed in unattended mode.
-
Validation Actions - <validationActionList>: Executes once the user has specified a value in the user interface page associated with the parameter and has pressed the Next button (or Enter in a text-based interface). The actions can be used to check that the value is valid (for example, that it specifies a path to a valid Perl interpreter). If any of the actions result in an error, an error message will be displayed to the user and the user will be prompted to enter a valid value.
-
Pre Show Page Actions - <preShowPageActionList>: Executes before the corresponding parameter page is displayed. This can be useful for changing the value of the parameter before it is displayed.
-
Post Show Page Actions - <postShowPageActionList>: Executes after the corresponding parameter page has been displayed. This can be useful for performing actions or setting environment variables based on the value of the parameter.
-
Ready to Install Actions - <readyToInstallActionList>: Executes right before the file copying step starts. It is commonly used to execute actions that depend on user input.
-
Unpacking process
-
Folder Actions - <actionList>: Executes just after files defined in the particular folder are installed, the next folder files are copied and its actionList executed, etc.
-
Shortcuts Creation
-
Post-installation Actions - <postInstallationActionList>: Executes after the installation process has taken place but before the uninstaller is created and the final page is displayed.
-
Post-Uninstaller Creation Actions - <postUninstallerCreationActionList>: Executes after the uninstaller has been created but before the final page has been displayed.
-
Final Page Actions - <finalPageActionList>: Executes after the installation has completed and the final page has been displayed to the user. These actions usually include launching the program that has just been installed. For each one of the actions contained in this list, a checkbox will be displayed (or a question in text mode). If the checkbox is selected, then the action will be executed when the Finish button is pressed.
Uninstallation
-
Pre-uninstallation Actions - <preUninstallationActionList>: Executes before the uninstallation process takes place, such as unsetting user-defined installer variables or deleting files created after installation occurred.
-
Post-uninstallation Actions - <postUninstallationActionList>: Executes after the uninstallation process takes place.
Special action lists
-
Installation Aborted Actions - <installationAbortedActionList>: Executes when the installation process is aborted.
Unattended mode, RPM and DEB packages
These are special cases. There is no interaction with the end-user and the following action lists are not executed:
As the file installation step is executed by the RPM / DEB package manager and not by InstallBuilder itself, there is no way to execute any action from the installer until the files have been installed on the system. To be precise, the <preInstallationActionList> will not be executed, and the <initializationActionList>, <readyToInstallActionList> and any folder’s actionList will be executed after the files have been installed on the system.
As a final note, the <installationAbortedActionList> will only be executed if the error was generated by any of the actions performed directly by the installer. I.e., if the error is generated during the file installation step, which is performed by the RPM / DEB package manager, the InstallBuilder installer application will not be notified and therefore the <installationAbortedActionList> will not be executed.
To summarize, the following list provides all of the differences regarding action lists when installing an RPM / DEB package:
-
<preBuildActionList>: executed as usual -
<postBuildActionList>: executed as usual -
<initializationActionList>: executed after file installation -
<preInstallationActionList>: not executed -
<componentSelectionValidationActionList>: not executed -
parameter
<validationActionList>: not executed -
parameter
<preShowPageActionList>: not executed -
parameter
<postShowPageActionList>: not executed -
<readyToInstallActionList>: executed after file installation -
folder
<actionList>: executed after file installation -
<postInstallationActionList>: executed as usual -
<finalPageActionList>: not executed -
<preUninstallationActionList>: executed as usual -
<postUninstallationActionList>: executed as usual -
<installationAbortedActionList>: executed only if error comes from any of the tasks performed directly by the InstallBuilder installer.
Main Project and Components Execution Order
Each action list may be included in the main project or inside the components. Let’s take an <initializationActionList> as an example. You have one main <initializationActionList> and 4 others in the components A, B, C and D. The components are declared following the order A, B, C, D (A is the first entry and D is the last one). In this case, the main <initializationActionList> is executed first and then each component’s action lists are executed (A, B, C, D - the order of component declaration is important).
You can divide all action lists into two groups based on what is executed first: main project or component action lists:
-
Main project action lists first and then components:
-
Component action lists first and then the main project:
The installer executes action lists by group, which means that first, all <initializationActionList> actions take place and then all <preInstallationActionList> actions are executed:
-
Project Initialization Action List
-
Component A Initialization Action List
-
Component B Initialization Action List
-
…
-
Project Preinstallation Action List
-
Component A Preinstallation Action List
-
Component B Preinstallation Action List …
For example, for a project with two components:
<project>
    ...
    <initializationActionList>
        <showInfo>
            <text>I'm the project in the initialization</text>
        </showInfo>
    </initializationActionList>
    <preInstallationActionList>
        <showInfo>
            <text>I'm the project in the preInstallation</text>
        </showInfo>
    </preInstallationActionList>
    <componentList>
        <component>
            <name>componentA</name>
            <description>Component A</description>
            ...
            <initializationActionList>
                <showInfo>
                    <text>I'm Component A in the initialization</text>
                </showInfo>
            </initializationActionList>
            <preInstallationActionList>
                <showInfo>
                    <text>I'm Component A in the preInstallation</text>
                </showInfo>
            </preInstallationActionList>
        </component>
        <component>
            <name>componentB</name>
            <description>Component B</description>
            <canBeEdited>1</canBeEdited>
            ...
            <initializationActionList>
                <showInfo>
                    <text>I'm Component B in the initialization</text>
                </showInfo>
            </initializationActionList>
            <preInstallationActionList>
                <showInfo>
                    <text>I'm Component B in the preInstallation</text>
                </showInfo>
            </preInstallationActionList>
        </component>
    </componentList>
</project>
If you build and execute the installer in, for example, unattended mode, you will see the following in the console:
 I'm the project  in the initialization
 I'm Component A in the initialization
 I'm Component B in the initialization
 I'm the project  in the preinstallation
 I'm Component A in the preInstallation
 I'm Component B in the preInstallation
The <installationAbortedActionList> will only be executed if the error was generated by any of the actions performed directly by the installer. If the error is generated during the file installation step, which is performed by the RPM / DEB package manager, the InstallBuilder installer application will not be notified and therefore the <installationAbortedActionList> will not be executed.
Running External Programs
In addition to built-in actions, InstallBuilder allows external programs to be executed through the <runProgram> action:
<runProgram>
  <program>kill</program>
  <programArguments>-f myBin</programArguments>
</runProgram>
After the external program ends, its standard streams are registered in the built-in variables ${program_stdout}, ${program_stderr} and ${program_exit_code}:
-
${program_stdout}: Program Standard Output -
${program_stderr}: Program Standard Error -
${program_exit_code}: Program Exit Code
For example, to get the path of the gksudo command on Linux you could use the snippet below:
   <runProgram>
      <program>which</program>
      <programArguments>gksudo</programArguments>
      <!-- The gksudo program may not be
      installed so it is necessary to mask errors -->
      <abortOnError>0</abortOnError>
      <showMessageOnError>0</showMessageOnError>
   </runProgram>
And get the path from the ${program_stdout} variable. If the execution fails, the variable will be defined as empty.
You can also execute more complex commands such as pipes or include redirections. For example, the code below can be used to count the number of files in a directory:
   <runProgram>
      <program>ls</program>
      <programArguments>-l ${installdir}/logs/*.log | wc -l</programArguments>
   </runProgram>
Although you can always check the created built-in variables, if you are explicitly calling the external program to use its output like in the gksudo example (as opposed to other cases, such us creating a MySQL database in which the important result is the database being created) it may be a better solution to use a <setInstallerVariableFromScriptOutput> action:
   <setInstallerVariableFromScriptOutput>
      <exec>which</exec>
      <execArgs>gksudo</execArgs>
      <name>gksudoPath</name>
      <!-- The gksudo program may not be
      installed so it is necessary to mask errors -->
      <abortOnError>0</abortOnError>
      <showMessageOnError>0</showMessageOnError>
   </setInstallerVariableFromScriptOutput>
The code above will create a new variable gksudoPath containing the ${program_stdout} of the executed program.
On Windows, the <runProgram> action will by default launch programs by their 8.3 names (the same path type obtained through the .dos suffix) to avoid potential errors dealing with spaces and invalid characters in the path. However, as the 8.3 path may change depending on other files in the folder, sometimes this is not convenient. For example, when you need to check if the executable is running through the <processTest> rule. In these cases, you can prevent the automatic 8.3 conversion using the <useMSDOSPath> tag:
<project>
...
<finalPageActionList>
...
<runProgram>
<progressText>Launch Application</progressText>
<program>${installdir}/My Application with long filename.exe"</program>
<programArguments>&</programArguments>
<!-- Use long filename -->
<useMSDOSPath>0</useMSDOSPath>
</runProgram>
...
</finalPageActionList>
...
<preUninstallationActionList>
<while>
<actionList>
<showWarning>
<text>The application "My Application with long filename.exe" is still running, please close it and click ok</text>
</showWarning>
</actionList>
<conditionRuleList>
<processTest>
<logic>is_running</logic>
<name>My Application with long filename.exe</name>
</processTest>
</conditionRuleList>
</while>
...
</preUninstallationActionList>
...
</project>The <runProgram> action can also be used to call external interpreters, for example, to execute Visual Basic or AppleScripts. The example below explains how to take advantage of this to restart the computer after the installation on OS X, in which the <rebootRequired> tag is not allowed:
<finalPageActionList>
  <actionGroup progressText="Reboot Computer">
    <actionList>
      <runProgram>
        <abortOnError>0</abortOnError>
        <program>osascript</program>
        <programArguments>-e "tell application \"Finder\" to restart"</programArguments>
        <showMessageOnError>0</showMessageOnError>
      </runProgram>
      <!-- If using osascript failed, try using reboot -->
      <runProgram>
        <program>reboot</program>
        <programArguments></programArguments>
        <ruleList>
          <compareText>
            <logic>does_not_equal</logic>
            <text>${program_stderr}</text>
            <value></value>
          </compareText>
        </ruleList>
      </runProgram>
    </actionList>
  </actionGroup>
</finalPageActionList>|
Caution
|
When running shell scripts with subscripts in background
On Unix, when calling shell scripts that also call subscripts in the background, even if the execution of the main shell script terminates, the installer keeps waiting for the launched child processes in background to close their standard streams. An example of this situation would be when manually starting a Unix service backup-daemon scriptWhen calling this script from the installer, for example using the code below: The child script backup-daemon script reworkedThis way the installer won’t hang waiting for output from Another solution that does not require modifying the service script would be to redirect the output when calling it from the installer: Or, if you are interested in the output, redirect it to files. The snippets below create a custom action to wrap the And call it when needed: |
Launching in the Background
The standard behavior of the <runProgram> action is to wait for the spawned process to end but it is also possible to launch the process in the
background by appending an ampersand to the arguments. For example, to execute our application at the end of the installation without preventing
the installer from finishing you could use the following snippet:
<finalPageActionList>
<runProgram>
<program>${installdir}/bin/myApplication.exe</program>
<programArguments>--arg1 value1 --arg2 value 2 &</programArguments>
</runProgram>
</finalPageActionList>Opening Programs in OS X
Application bundles are the most common way of distributing software packages on OS X. They are presented as a single file which is actually a directory containing all of the necessary resources (images, libraries…).
These bundles can be executed by double-clicking on them, as if they were regular files, so it is a common mistake to try to execute them using the command line as:
$> /Applications/InstallBuilder\ Professional\ 23.1.0/bin/Builder.appOr alternatively, using InstallBuilder actions:
   <runProgram>
      <program>/Applications/InstallBuilder Professional 23.1.0/bin/Builder.app</program>
   </runProgram>
Which results in an error similar to: "-bash: /Applications/InstallBuilder Professional 23.1.0/bin/Builder.app/: is a directory" or a more detailed error suggesting using open (see below) in recent InstallBuilder versions.
There are two ways of executing an application bundle:
-
Using the
opencommand: This command is the equivalent of a double-click over the bundle. It can be also used to open regular files, which will launch the associated application:
   <runProgram>
      <program>open</program>
      <programArguments>"${installdir}/YourApplication.app"</programArguments>
   </runProgram>
The default behavior of the open command is to launch the process in background, so you don’t need to add an "&" at the end of the arguments.
However, if you want to make InstallBuilder wait for the process to finish (launch the bundle in the foreground) you can use the -W command line flag:
   <runProgram>
      <program>open</program>
      <programArguments>-W "${installdir}/YourApplication.app"</programArguments>
   </runProgram>
A limitation of using open to launch the bundle is that it does not support passing arguments to the launched application in its early versions (it started supporting it from OS X 10.6.2). If you just support versions newer than OS X 10.6.2, you can use the --args command line flag:
   <runProgram>
      <program>open</program>
      <programArguments>-W "${installdir}/YourApplication.app" --args --data-dir ${installdir}/data --check-for-updates</programArguments>
   </runProgram>
All the arguments after --args are directly passed to the application, so you don’t have to surround them by quotes.
-
Calling the
CFBundleExecutablespecified in theInfo.plistfile: The application bundle contains an XML document describing multiple aspects of the bundle behavior (the binary to execute when double clicked, the icon to use in the dock…). One of the keys specified isCFBundleExecutable, which determines which of the contained files will be executed when opening the bundle. There are multiple ways of retrieving this key but the easiest way is by executing:
$> defaults read /Applications/InstallBuilder/bin/Builder.app/Contents/Info CFBundleExecutableWhich will return the file that will be executed relative to the directory Builder.app/Contents/MacOS. In the case of InstallBuilder application bundles, it will return installbuilder.sh (Builder.app/Contents/MacOS/installbuilder.sh).
Another possibility would be to just open it with a text editor and look for the CFBundleExecutable key and its <string>:
$> emacs Builder.app/Contents/Info.plistOr from Finder, in the "right-click" menu, clicking "Show Package Contents" and opening Contents/Info.plist.
Using this information, you can execute it using the <runProgram> action:
   <runProgram>
      <program>/Applications/InstallBuilder/bin/Builder.app/Contents/MacOS/installbuilder.sh</program>
      <programArguments>build ~/project.xml linux</programArguments>
   </runProgram>
Displaying Progress While Executing Long Running Actions
When the actions executed require a long time to complete, such as waiting for a service to start or when uncompressing a zip file, it is advisable to provide some feedback to the end user. The first way of providing feedback is defining a progressText in your action. If the actions are executed during the <postInstallationActionList>, <postUninstallerCreationActionList> or in a <folder>'s action list, the main progress bar used to display the unpacking process will display the defined message:
<component>
<name>myComponent</name>
...
<folderList>
<folder>
<name>documents</name>
...
<actionList>
<runProgram progressText="Starting Apache Server...">
<program>${installdir}/apache/apachectl</program>
<programArguments>start &</programArguments>
</runProgram>
<wait ms="3000" progressText="Waiting apache server to start..."/>
</actionList>
</folder>
</folderList>
</component>However, if the action is going to take a lot of time, it would be an even better idea to wrap the actions in a <showProgressDialog>. This dialog displays an indeterminate progress bar in a pop-up while executing the wrapped child actions. It will also take control of the execution so the user will not be able to interact with the main window until the actions complete. Canceling the pop-up will cancel the installation:
 <showProgressDialog>
    <title>Extracting files</title>
    <width>400</width>
    <height>100</height>
    <actionList>
      <!-- The unzip action will provide a built-in progress text with
      the file being unpacked so you don't need to provide one -->
      <unzip>
        <destinationDirectory>${installdir}/content</destinationDirectory>
        <zipFile>${installdir}/content.zip</zipFile>
      </unzip>
      <deleteFile>
        <progressText>Removing original zip file</progressText>
        <path>${installdir}/content.zip</path>
      </deleteFile>
    </actionList>
 </showProgressDialog>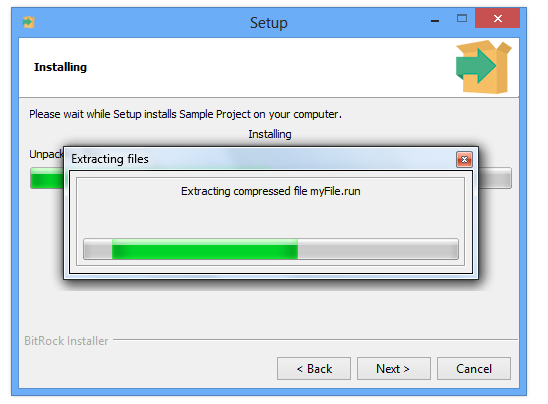
The <showProgressDialog> will behave differently when its only child is an <httpGet> action. In this case, instead of displaying an indeterminate progress pop-up, a continuous bar with the speed and the progress of the download will be displayed:
<showProgressDialog>
    <title>Downloading files</title>
    <actionList>
        <httpGet>
            <filename>/tmp/ib.run</filename>
            <url>http://installbuilder.com/installbuilder-enterprise-23.1.0-linux-installer.run</url>
        </httpGet>
    </actionList>
</showProgressDialog>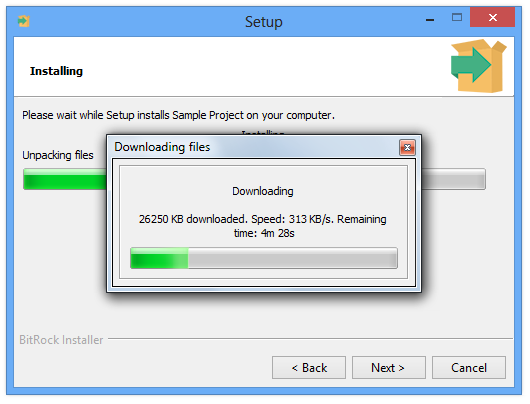
Creating Custom Actions
In addition to the built-in actions, InstallBuilder allows you to create new custom actions using a mix of base actions and rules. New actions are defined using the <functionDefinitionList>.
For example, let’s suppose you have a lot of long running <runProgram> actions (for example installing sub installers in unattended mode) and you are enclosing all of them in a <showProgressDialog>:
  <showProgressDialog>
     <title>Please wait ...</title>
     <actionList>
        <runProgram>
           <program>${yourProgram}</program>
           <programArguments>--mode unattended --prefix "${installdir}"</programArguments>
        </runProgram>
     </actionList>
  </showProgressDialog>
You could then create a new action called <unattendedRunProgamWithProgress> that will just accept the program to execute and some additional arguments:
<project>
    ...
    <functionDefinitionList>
        <!-- Define the action -->
        <actionDefinition>
            <name>unattendedRunProgamWithProgress</name>
            <actionList>
                <showProgressDialog>
                    <title>Please wait ...</title>
                    <actionList>
                        <runProgram progressText="Installing ${program}">
                            <program>${program}</program>
                            <programArguments>--mode unattended ${programArguments}</programArguments>
                        </runProgram>
                    </actionList>
                </showProgressDialog>
            </actionList>
            <parameterList>
                <stringParameter name="program" value="" default=""/>
                <stringParameter name="programArguments" value="" default=""/>
            </parameterList>
        </actionDefinition>
    </functionDefinitionList>
    <initializationActionList>
        <!-- Use the new action -->
        <unattendedRunProgamWithProgress>
            <program>${yourProgram}</program>
            <programArguments>--prefix "${installdir}"</programArguments>
        </unattendedRunProgamWithProgress>
    </initializationActionList>
    ...
</project>
This new action will take care of displaying the progress dialog and launching the program in unattended mode. The basics of how to define a new custom action are as follow:
-
<name>: The new custom action will be available in other parts of the XML by its name. No other custom action can be defined with the same<name>. -
<actionList>: This<actionList>defines the set of actions to wrap. In addition to built-in actions, it also accepts other custom actions (if they were previously defined). -
<parameterList>: This<parameterList>defines the parameters of the new action. They are used to interface with the inner actions in the<actionList>. In addition to the settings defined in the<parameterList>, the new custom action will also support all the common action properties such as<progressText>,<show>,<abortOnError>,<action.showMessageOnError>…
For example, if you want to wrap the built-in <unpackDirectory> action to make it safer and previously backup the destination, you could use:
<functionDefinitionList>
  <actionDefinition>
   <name>unpackDirectoryWithBackup</name>
     <actionList>
        <actionGroup>
           <actionList>
              <createTimeStamp>
                 <format>%s</format>
                 <variable>timestamp</variable>
              </createTimeStamp>
              <logMessage>
                 <text>File ${destination} already exists, renaming it to ${destination}.${timestamp}</text>
              </logMessage>
              <renameFile>
                 <destination>${destination}.${timestamp}</destination>
                 <origin>${destination}</origin>
              </renameFile>
           </actionList>
           <ruleList>
              <fileExists path="${destination}"/>
           </ruleList>
        </actionGroup>
        <unpackDirectory>
           <component>${component}</component>
           <destination>${destination}</destination>
           <folder>${folder}</folder>
           <origin>${origin}</origin>
        </unpackDirectory>
     </actionList>
     <parameterList>
        <stringParameter name="component" value="" default=""/>
        <stringParameter name="folder" value="" default=""/>
        <stringParameter name="origin" value="" default=""/>
        <stringParameter name="destination" value="" default=""/>
     </parameterList>
  </actionDefinition>
</functionDefinitionList>
The new action will then be available at any point in the installation:
<project>
  ...
  <initializationActionList>
     <unpackDirectoryWithBackup>
       <component>binaries</component>
       <folder>bin</folder>
       <origin>checker/checker.bin</origin>
       <destination>${installdir}/temp</destination>
     </unpackDirectoryWithBackup>
  </initializationActionList>
  ...
</project>
In the example above, the <parameterList> was basically a map of the main properties accepted by the <unpackDirectory> action and the <actionList> included a couple of actions to do the backup and log some information before calling <unpackDirectory>.
Another useful example could be to manage your bundled Apache server:
<project>
 ...
 <functionDefinitionList>
  <actionDefinition>
    <name>apache</name>
      <actionList>
         <runProgram program="${apacheCtlPath}" programArguments="${action}"/>
      </actionList>
      <parameterList>
         <stringParameter name="action" value="" default="start"/>
         <stringParameter name="apacheCtlPath" value="" default="${installdir}/apache2/bin/apachectl"/>
      </parameterList>
  </actionDefinition>
 </functionDefinitionList>
 ...
 <initializationActionList>
   <apache action="start"/>
 </initializationActionList>
 ...
</project>
Returning values from a custom action
I some cases, you may want to create custom actions that perform some operations and return the result in a variable. The obvious way of achieving this would be to implement something like the following:
<project>
 ...
 <functionDefinitionList>
  <actionDefinition>
    <name>getPreviousInstallDir</name>
      <actionList>
         <setInstallerVariable name="dir" value=""/>
         <setInstallerVariable name="dir" value="${env(OLD_DIR)}" >
           <ruleList>
              <platformTest type="unix"/>
           </ruleList>
         </setInstallerVariable>
         <registryGet>
           <key>HKEY_LOCAL_MACHINE\Software\${project.windowsSoftwareRegistryPrefix}</key>
           <name>Location</name>
           <variable>installdir</variable>
           <ruleList>
              <platformTest type="windows"/>
           </ruleList>
         </registryGet>
         <!-- Set the return value. ${result} contains the name
         of the variable provided by the caller -->
         <setInstallerVariable name="${result}" value="${dir}"/>
      </actionList>
      <parameterList>
         <stringParameter name="result" value="" default=""/>
      </parameterList>
  </actionDefinition>
 </functionDefinitionList>
 ...
 <initializationActionList>
   <getPreviousInstallDir result="previous_dir"/>
 </initializationActionList>
 ...
</project>
However, if you try this, you will realize that the previous_dir variable will still be undefined after the execution of the custom action. The reason is that all the variables used in the custom action are just a local copy of the project level variables. The same way, variables created inside the custom action are not available in the global scope. This way, you can safely use any variable inside the function without affecting other project level variables.
To solve this issue, you just need to mark the desired variables as global using the <globalVariables> action. This action accepts a space-separated list of variable names that will then be preserve their values outside the custom action. In our example:
<project>
 ...
 <functionDefinitionList>
  <actionDefinition>
    <name>getPreviousInstallDir</name>
      <actionList>
         <!-- Define the variable configured as global -->
         <globalVariables names="${result}"/>
         <setInstallerVariable name="dir" value=""/>
         <setInstallerVariable name="dir" value="${env(OLD_DIR)}" >
           <ruleList>
              <platformTest type="unix"/>
           </ruleList>
         </setInstallerVariable>
         <registryGet>
           <key>HKEY_LOCAL_MACHINE\Software\${project.windowsSoftwareRegistryPrefix}</key>
           <name>Location</name>
           <variable>installdir</variable>
           <ruleList>
              <platformTest type="windows"/>
           </ruleList>
         </registryGet>
         <!-- Set the return value. ${result} contains the name
         of the variable provided by the caller -->
         <setInstallerVariable name="${result}" value="${dir}"/>
      </actionList>
      <parameterList>
         <stringParameter name="result" value="" default=""/>
      </parameterList>
  </actionDefinition>
 </functionDefinitionList>
 ...
 <initializationActionList>
   <getPreviousInstallDir result="previous_dir"/>
 </initializationActionList>
 ...
</project>
Take into account that once a variable is defined as global, it will always be accessible from other custom actions, even if they did not declare it as global.
|
Note
|
Custom actions return values
To return values from a custom action you must create a parameter in which the result will be returned and mark it as global using the |
Current Limitations
The Custom Actions are still under development and although the functionality is fully usable, they have some known limitations:
To make the builder recognize a custom action as a valid XML element, it must be defined in the XML project before it is used. For example, the below will fail with "Unknown tag <myShowInfo>" error:
<project>
  ...
  <initializationActionList>
    <myShowInfo/>
  </initializationActionList>
  ...
  <functionDefinitionList>
    <actionDefinition>
       <name>myShowInfo</name>
       <actionList>
         <showInfo text="This is a customized showInfo: ${text}"/>
       </actionList>
       <parameterList>
         <stringParameter name="text"/>
       </parameterList>
    </actionDefinition>
  </functionDefinitionList>
  ...
</project>
However, changing the order will fix the issue:
<project>
  ...
  <functionDefinitionList>
    <actionDefinition>
       <name>myShowInfo</name>
       <actionList>
         <showInfo text="This is a customized showInfo: ${text}"/>
       </actionList>
       <parameterList>
         <stringParameter name="text"/>
       </parameterList>
    </actionDefinition>
  </functionDefinitionList>
  ...
  <initializationActionList>
    <myShowInfo/>
  </initializationActionList>
  ...
</project>
Future versions will fix the issue by implementing a two-pass XML parser.
They cannot be defined in the tree, but actions defined using the integrated XML editor (or externally added) will be available as other regular actions in the action-selector dialog.
The <name> must only contain ascii letters. The same applies to its parameters.
If you define a new <showInfo>, and a built-in <showInfo> already exists, it will be ignored.
Error Handling
During the installation or uninstallation process, there are scenarios in which the installer encounters a non-recoverable error or simply is manually aborted. This section explains how these scenarios are handled by InstallBuilder and how to manually define actions in case of failure either to clean the installation or to try to recover.
Handling Action Errors
All actions include some error handling tags that make it very easy to specify the desired behavior when an error is found during its execution.
-
<abortOnError>: This property configures whether or not to abort the execution of the current action list when one of its child actions fails. Its default value is1.
For example, in the next snippet, the second action will never be executed:
<initializationActionList>
   <throwError text="This will abort the installation!"/>
   <showInfo text="This will never be executed"/>
</initializationActionList>
But if you set abortOnError="0", even if a message is displayed, the execution will not be aborted:
<initializationActionList>
   <throwError text="This will not abort the installation!" abortOnError="0"/>
   <showInfo text="And this will be executed after the error pop-up"/>
</initializationActionList>-
<showMessageOnError>: This property configures whether or not to display a pop-up notifying the user of the error. Its default value is1. If you setshowMessageOnError="0"and an error occurs, if the action is not configured to ignore errors withabortOnError="0", the rest of the actions in the action list will be skipped. However, although the actions will be skipped, no error will be propagated upward so the installation will not be aborted:
<initializationActionList>
   <throwError text="This will not abort the installation but no other action in the initializationActionList will be executed!" showMessageOnError="0"/>
   <showInfo text="This will never be executed"/>
</initializationActionList>
To completely mask an error, you can use a combination of showMessageOnError="0" and abortOnError="0". A real world example could be to determine if certain Linux command is available and getting its path:
<initializationActionList>
   <!-- The below will fail in some cases
   but we do not want to display any error or to abort -->
   <runProgram>
      <program>which</program>
      <programArguments>gksudo</programArguments>
      <showMessageOnError>0</showMessageOnError>
      <abortOnError>0</abortOnError>
   </runProgram>
   <showInfo text="gksudo is not available" >
      <ruleList>
         <compareText text="${program_stdout}" logic="equals" value=""/>
      </ruleList>
   </showInfo>
   <showInfo text="gksudo is available and its path is ${program_stdout}" >
      <ruleList>
         <compareText text="${program_stdout}" logic="does_not_equal" value=""/>
      </ruleList>
   </showInfo>
</initializationActionList>-
<customErrorMessage>: When an action fails, InstallBuilder generates a built-in error to be displayed ifshowMessageOnError="1"This error message can be overwritten using thecustomErrorMessageproperty. For example, calling a nonexistent commandfoowould normally result in an error such as "foo not found" but you can customize it to: "foo must be installed, aborting…":
 <runProgram>
   <program>foo</program>
   <customErrorMessage>foo must be installed, aborting...</customErrorMessage>
 </runProgram>
The errors are also stored in the ${installer_error_message} (containing the error message reported to the user, masked by the <customErrorMessage> if any) and ${installer_error_message_original} (the original error message, unmasked by the <customErrorMessage>) built-in variables. The variables are accessible at the time the <customErrorMessage> is resolved so you could create a custom error message that also includes the original error as the details:
 <runProgram>
   <program>foo</program>
   <customErrorMessage>foo must be installed: ${installer_error_message_original}</customErrorMessage>
</runProgram>-
<onErrorActionList>: When an action reports an error during its execution, regardless of the values ofshowMessageOnErrorandabortOnError, itsonErrorActionListwill be executed. For example, you can use it to clean the effects of the failed action before continuing aborting:
  <!-- Try to copy some images to the installation directory and then create a pdf
  file but if the process fail, do not want to preserve the images and the malformed
  pdf file. The action will take care of the cleaning itself -->
  <actionGroup>
     <actionList>
        <!-- ${installer_directory} is resolved to the
        directory of the installer -->
        <copyFile origin="${installer_directory}/images" destination="${installdir}"/>
        <runProgram>
          <program>convert</program>
          <programArguments>${installdir}/images/*.jpg ${installdir}/myImages.pdf</programArguments>
        </runProgram>
     </actionList>
     <onErrorActionList>
        <deleteFile path="${installdir}/images"/>
        <deleteFile path="${installdir}/myImages.pdf"/>
     </onErrorActionList>
  </actionGroup>
Using the <onErrorActionList> and the ${installer_error_message_original} variable you could also throw a friendly error to your users while still providing the specific details in the log for debugging purposes:
 <runProgram>
    <customErrorMessage>Error generating pdf file</customErrorMessage>
    <program>convert</program>
    <programArguments>${installdir}/images/*.jpg ${installdir}/myImages.pdf</programArguments>
    <onErrorActionList>
      <logMessage>
        <text>Error generating pdf file: ${installer_error_message_original}</text>
      </logMessage>
    </onErrorActionList>
 </runProgram>
Installation Aborted Action List
This action list gets executed when the project is aborted, either by the user or by an internal error. It provides a global way of dealing with the error in contra-position to the specific approach of the <onErrorActionList>. For example, it could be used to make sure the installation directory is deleted after the installation is being canceled:
<project>
  ...
  <installationAbortedActionList>
     <deleteFile path="${installdir}"/>
  </installationAbortedActionList>
  ...
</project>
You can also differentiate between an installation aborted by the user or an error checking the built-in variable ${installation_aborted_by_user}.
When Does an Error Not Abort the Installation?
In most cases, when an error is thrown and it is not caught at any point using abortOnError="0" (the error is completely ignored) or showMessageOnError="0" (the error aborts the current action list but is not propagated upwards), it aborts the installation. However, there are some special cases in which the error is treated as a warning or is ignored:
-
Parameter’s Validation Actions (
<validationActionList>): If an unmasked error occurs inside a parameter action list, the rest of actions in the<validationActionList>are skipped and the error is reported to the user but instead of aborting the installation, the page is redrawn. For example, if you unconditionally throw an error in a<validationActionList>, the installer will never continue after this page:
<directoryParameter>
   <name>installdir</name>
   <validationActionList>
      <throwError text="This page will be displayed again and again !"/>
   </validationActionList>
</directoryParameter>-
Component’s Validation Actions (
<componentSelectionValidationActionList>): If an unmasked error occurs inside this action list, the same way it happens with the<validationActionList>, the error is reported to the user but instead of aborting the installation, the component selection page is redrawn:
<component>
    <name>C</name>
    <description>Component C</description>
    <detailedDescription>This component depends on 'A' and 'B'</detailedDescription>
    ...
    <componentSelectionValidationActionList>
        <throwError>
            <text>Component 'C' cannot be installed if you have not selected both 'A' and 'B'.</text>
            <ruleList>
                <isFalse value="${component(A).selected}"/>
                <isFalse value="${component(B).selected}" />
            </ruleList>
        </throwError>
    </componentSelectionValidationActionList>
    ...
</component>-
Post Installation Actions and following (
<postInstallationActionList>): At this point of the installation, all of the files have already been copied. If an error happens, instead of aborting the installation, it just prevents the execution of the remaining actions in that list and it is reported. This also applies to the<postUninstallerCreationActionList>and<finalPageActionList>lists. -
Pre and Post Uninstallation Actions (
<preUninstallationActionList>,<postUninstallationActionList>): If an error occurs in these action lists, it aborts the rest of the actions in the list but it is not reported, just logged in the uninstallation log. -
Pre Show Help Actions (
<preShowHelpActionList>): Any error in this action list will just skip the rest of actions in the list and will be silently ignored
Cleaning and Rollback Directory Restoration
When the installer is aborted by the user during the installation of files, all of the unpacked files will be automatically deleted. If the rollback functionality was enabled using <enableRollback>1</enableRollback>, the old files overwritten by the process will be restored.
Take into account that files manually deleted, copied or moved will not be automatically handled so the <installationAbortedActionList> must be used for this purpose.
List of Available Actions
HTTP Actions
HTTP GET Request
Access a URL and save the result into a file.
The allowed properties in the <httpGet> action are:
-
<filename>: Filename to which to save the result to -
<password>: Password for URLs that require authentication -
<url>: URL to launch -
<username>: Username for URLs that require authentication -
<httpHeadersList>: List of headers for the request
Examples:
<httpGet>
    <filename>${installdir}/README.txt</filename>
    <url>http://www.example.com/docs/readme.txt</url>
    <username>foo</username>
    <password>bar</password>
</httpGet><showProgressDialog>
<title>Downloading files</title>
<actionList>
<httpGet>
<filename>${system_temp_directory}/ib.run</filename>
<url>http://installbuilder.com/installbuilder-enterprise-23.1.0-linux-installer.run</url>
</httpGet>
</actionList>
</showProgressDialog><httpGet>
<filename>${installdir}/README.txt</filename>
<url>http://www.example.com/docs/readme.txt</url>
</httpGet>
<throwError>
<text>Failed to retrieve remote file</text>
<ruleList>
<compareText text="${installer_http_code}" logic="does_not_equal" value="200"/>
</ruleList>
</throwError><httpGet>
<filename>${installdir}/welcome.txt</filename>
<url>http://www.example.com/index.php</url>
<httpHeadersList>
<httpHeader>
<name>Accept-Language</name>
<value>en-US,en;q=0.8,es;q=0.6</value>
</httpHeader>
</httpHeadersList>
</httpGet>HTTP POST Request
Access a URL using HTTP POST and save the result into a file.
The allowed properties in the <httpPost> action are:
-
<contentType>: Content-type HTTP header. -
<data>: Raw data that will be included in the POST query. -
<filename>: Filename to which to save the result to -
<password>: Password for URLs that require authentication -
<url>: URL to launch -
<username>: Username for URLs that require authentication -
<httpHeadersList>: List of headers for the request -
<queryParameterList>: List of variables that will be included in the POST query.
Examples:
<parameterGroup>
   <name>credentials</name>
   <title>Account Credentials</title>
   <explanation>Introduce Your account credentials</explanation>
   <parameterList>
      <stringParameter name="username" description="Username:"/>
      <passwordParameter name="password" description="Password:"/>
      <stringParameter name="key" description="License key:"/>
   </parameterList>
   <validationActionList>
      <httpPost>
        <url>http://www.example.com/register.php</url>
        <filename>${installdir}/result</filename>
        <queryParameterList>
          <queryParameter name="name" value="${username}"/>
          <queryParameter name="pass" value="${password}"/>
          <queryParameter name="license" value="${key}"/>
        </queryParameterList>
      </httpPost>
      <readFile path="${installdir}/result" name="result"/>
      <deleteFile path="${installdir}/result"/>
      <throwError>
        <text>The provided credentials are not valid</text>
        <ruleList>
          <compareText>
            <text>${result}</text>
            <logic>does_not_contain</logic>
            <value>OK</value>
          </compareText>
        </ruleList>
      </throwError>
   </validationActionList>
</parameterGroup><httpPost>
<url>http://www.example.com/register.php</url>
<filename>${installdir}/result</filename>
<queryParameterList>
<queryParameter name="name" value="${username}"/>
<queryParameter name="pass" value="${password}"/>
<queryParameter name="license" value="${key}"/>
</queryParameterList>
</httpPost>
<throwError>
<text>Could not register installation</text>
<ruleList>
<compareText text="${installer_http_code}" logic="does_not_equal" value="200"/>
</ruleList>
</throwError><httpPost>
<url>http://www.example.com/register.php</url>
<filename>${installdir}/result</filename>
<contentType>application/json</contentType>
<data><![CDATA[{
"user": "JohnDoe",
"password": "secret"
}]]>
</data>
</httpPost>Configure proxy
Configure a proxy to be used by the http actions (<httpGet> and <httpPost>).
The allowed properties in the <httpProxyInit> action are:
-
<exclude>: Space separated list of patters for urls that will be excluded from the proxy configuration -
<password>: Proxy server password -
<port>: Proxy server port -
<server>: Proxy server url -
<username>: Proxy server username
If no properties are defined, the action will try to aoutodetect the proxy configured in the system.
Examples:
<parameterGroup>
   <name>proxyConfiguration</name>
   <title>Configuration</title>
   <explanation></explanation>
   <parameterList>
      <stringParameter name="username" description="Username:"/>
      <passwordParameter name="password" description="Password:"/>
      <parameterGroup>
        <name>proxyServer</name>
        <orientation>horizontal</orientation>
        <parameterList>
          <stringParameter name="server" description="Server:     "/>
          <stringParameter name="port" description="Port:" width="5"/>
        </parameterList>
      </parameterGroup>
   </parameterList>
   <postShowPageActionList>
      <httpProxyInit>
         <username>${username}</username>
         <password>${password}</password>
         <server>${server}</server>
         <port>${port}</port>
      </httpProxyInit>
   </postShowPageActionList>
</parameterGroup><httpProxyInit/>Encode URL
Encode a given text using URL formatting specifications and place the result in a variable.
The allowed properties in the <urlEncode> action are:
-
<text>: Text to encode -
<variable>: Variable to store the result in
Examples:
<urlEncode>
    <text>Some long text to
send to your server containg a lot of
forbiden characters such as ? [ and @</text>
    <variable>encodedText</variable>
</urlEncode>
In the example above, the encoded text would be Some+long+text+to%0d%0asend+to+your+server+containg+a+lot+of%0d%0aforbiden+characters+such+as+%3f+%5b+and+%40, ready to send to our server using an <httpPost> action.
Decode URL
Decode a given text using URL formatting specifications and place the result in a variable.
The allowed properties in the <urlDecode> action are:
-
<text>: Text to decode -
<variable>: Variable to store the result in
Examples:
<urlDecode>
   <text>Some+long+text+to%0d%0asend+to+your+server+containg+a+lot+of%0d%0aforbiden+characters+such+as+%3f+%5b+and+%40</text>
   <variable>decodedText</variable>
</urlDecode>
The action will store the below text in the variable ${decodedText}:
Some long text to
send to your server containg a lot of
forbiden characters such as ? [ and @
Launch Browser
Launch the default web browser with a given URL.
The allowed properties in the <launchBrowser> action are:
-
<url>: URL of the page to be shown.
Examples:
<finalPageActionList>
   <launchBrowser>
     <url>www.downloads.com/optional</url>
     <progressText>Would you like to visit our website to download
     additional modules?</progressText>
   </launchBrowser>
</finalPageActionList>File Manipulation Actions
DOS to Unix File Conversion
Convert plain text files in DOS/Mac format to Unix format. It is specially useful to fix Unix shell scripts modified on Windows.
The allowed properties in the <dos2unix> action are:
-
<excludeFiles>: Patterns to exclude files -
<files>: File patterns to apply action to -
<matchHiddenFiles>: Whether or not to attempt to match Windows hidden files
Examples:
<dos2unix>
    <files>${installdir}/scripts/*.sh</files>
</dos2unix>
Unix to DOS File Conversion
Convert plain text files in Unix format to DOS format. It is specially useful to fix Windows bat files modified on Unix.
The allowed properties in the <unix2dos> action are:
-
<excludeFiles>: Patterns to exclude files -
<files>: File patterns to apply action to -
<matchHiddenFiles>: Whether or not to attempt to match Windows hidden files
Examples:
<unix2dos>
  <files>${installdir}/scripts/*.bat</files>
</unix2dos>
Read value from XML file
Read value of element or attribute from an XML file
The allowed properties in the <xmlFileGet> action are:
-
<attribute>: If present, the action will refer to the attribute instead of the element -
<element>: XPath expression pointing to the selected element -
<file>: Path to XML file -
<variable>: Variable where to start the result
Examples:
If you have an Info.plist file with contents:
<?xml version="1.0" encoding="UTF-8"?>
<!DOCTYPE plist PUBLIC "-//Apple Computer//DTD PLIST 1.0//EN" "http://www.apple.com/DTDs/PropertyList-1.0.dtd">
<plist version="1.0">
   <dict>
        <key>CFBundleDevelopmentRegion</key>
        <string>English</string>
        <key>CFBundleExecutable</key>
        <string>installbuilder.sh</string>
        <key>CFBundleIdentifier</key>
        <string>com.installbuilder.appinstaller</string>
        <key>CFBundleInfoDictionaryVersion</key>
        <string>6.0</string>
        ...
   </dict>
</plist>
You can access the CFBundleExecutable associated string using:
<xmlFileGet>
    <attribute></attribute>
    <element>/plist/dict[1]/string[preceding-sibling::key[1]/text()="CFBundleExecutable"]</element>
    <file>${installdir}/some.app/Contents/Info.plist</file>
    <variable>CFBundleExecutable</variable>
</xmlFileGet>
And store installbuilder.sh in the variable ${CFBundleExecutable}.
If instead of working with XML elements you need to read an attribute, like the <progressText> in the below InstallBuider action:
<actionList>
<runProgram progressText="Launch ${project.fullName}" >
<program>${installdir}/bin/app.exe</program>
<programArguments>&</programArguments>
</runProgram>
</actionList>You can use:
<xmlFileGet>
    <!-- Specify the XML element containing the attribute -->
    <element>/actionList/runProgram</element>
    <!-- Specify the attribute -->
    <attribute>progressText</attribute>
    <file>${build_project_directory}/actionList.xml</file>
    <variable>progressText</variable>
</xmlFileGet>
Which will store Launch ${project.fullName} in the variable ${progressText}.
Set value in XML file
Set the value of an element or attribute in an XML file
The allowed properties in the <xmlFileSet> action are:
-
<attribute>: If present, the action will refer to the attribute instead of the element -
<element>: XPath expression pointing to the selected element -
<file>: Path to XML file -
<value>: Value to store in element or attribute
Examples:
To modify an entry in a XML address book:
<addressBook>
   <addressList>
      <address name="Jhon" email="jhon@myemail.com"/>
      <address name="joseph" email="joseph@myemail.com"/>
   </addressList>
</addressBook>
You can use:
<xmlFileSet>
    <attribute>email</attribute>
    <element>/addressBook/addressList/address[@name="Jhon"]</element>
    <file>${installdir}/config/address.xml</file>
    <value>jhonhome@otheremail.com</value>
</xmlFileSet>
Comment subtree of XML file
Comment entire subtree of an XML file
The allowed properties in the <xmlFileCommentElement> action are:
Examples:
To remove (commenting it) one of the entries in the XML address book from our previous example:
<xmlFileCommentElement>
    <element>/addressBook/addressList/address[@name="joseph"]</element>
    <file>${installdir}/config/address.xml</file>
</xmlFileCommentElement>
Read File Contents
Read the contents of a file and save it in a variable.
The allowed properties in the <readFile> action are:
-
<encoding>: Encoding of the text file -
<endOfLineConversion>: End Of Line Conversion -
<name>: Variable to which to save the file contents -
<path>: Path to the file you wish to read the contents from -
<removeBOM>: Whether or not to remove or not Byte Order Mark on Unicode files
Examples:
<finalPageActionList><finalPageActionList>
<actionGroup progressText="View readme file">
<actionList>
<readFile>
<name>text</name>
<path>${installdir}/readmes/README-1.txt</path>
</readFile>
<showText>
<text>${text}</text>
<title>README</title>
</showText>
</actionList>
</actionGroup>
</finalPageActionList>Write Text to File
Create or replace a file with a certain text content.
The allowed properties in the <writeFile> action are:
-
<encoding>: Encoding of the text file -
<endOfLineConversion>: End Of Line Conversion -
<path>: Path of the file to be created or replaced -
<text>: Text to write
Examples:
<writeFile>
<path>${installdir}/summary.txt</path>
<!-- 
 is the XML escape sequence for
the line break -->
<text>Username: ${username}
Password: *******
Installation Type: ${project.installationType}
IP: ${ip}
Port: ${port}</text>
</writeFile>Append Text to File
Append text to a file. If the file does not exist, it will be created.
The allowed properties in the <addTextToFile> action are:
-
<encoding>: Encoding of the text file -
<endOfLineConversion>: End Of Line Conversion -
<file>: Path to the file -
<insertAt>: Whether to insert the text at the beginning or at the end of the file -
<text>: Text to append
Examples:
<addTextToFile>
    <file>${installdir}/ChangeLog</file>
    <text>* Fixed application failing to start from directory with spaces.
* Added new plugins
* Removed unnecessary libraries
* Reworked UI
</text>
    <ruleList>
       <compareText text="${project.installationType}" logic="equals" value="upgrade"/>
       <fileExists path="${installdir}/ChangeLog"/>
    </ruleList>
</addTextToFile>Set INI File Property
Set property values of a INI file. If the file does not exists it will be created.
The allowed properties in the <iniFileSet> action are:
Examples:
<iniFileSet>
    <file>${installdir}/mysql/my.cnf</file>
    <section>mysqld</section>
    <key>port</key>
    <value>${port}</value>
</iniFileSet>
<iniFileSet>
    <file>${installdir}/mysql/my.cnf</file>
    <section>mysqld</section>
    <key>socket</key>
    <value>/tmp/mysql.sock</value>
</iniFileSet>
<iniFileSet>
    <file>${installdir}/mysql/my.cnf</file>
    <section>client</section>
    <key>password</key>
    <value>somePassWord!</value>
</iniFileSet>
Additional Examples:
Example 1
Get INI File Property
Extract property values out of a INI file. If the key does not exists, the variable will be set to empty.
The allowed properties in the <iniFileGet> action are:
-
<file>: Path to INI file -
<key>: Property Key -
<section>: INI section -
<variable>: Variable name to save property to
Examples:
<iniFileGet>
    <file>${installdir}/php/etc/php.ini</file>
    <key>include_path</key>
    <section>PHP</section>
    <variable>php_include_path</variable>
</iniFileGet>
Additional Examples:
Example 1
Write Property File Value
Writes out property values to a properties file, creating a new file if it does not exist.
The allowed properties in the <propertiesFileSet> action are:
-
<encoding>: Encoding of the text file -
<endOfLineConversion>: End Of Line Conversion -
<file>: Path to the property file -
<key>: Property key -
<value>: Value to set the key to.
Examples:
<propertiesFileSet>
    <file>${installdir}/installation.properties</file>
    <key>version</key>
    <value>${project.version}</value>
</propertiesFileSet>
Get Property File Value
Extract property values out of a properties file.
The allowed properties in the <propertiesFileGet> action are:
-
<encoding>: Encoding of the text file -
<endOfLineConversion>: End Of Line Conversion -
<file>: Path to the property file -
<key>: Property key -
<variable>: Variable name to save property to
Examples:
<propertiesFileGet>
   <file>${installdir}/installation.properties</file>
   <key>version</key>
   <variable>installedVersion</variable>
</propertiesFileGet>
<throwError text="The installed application is up to date. Aborting">
   <ruleList>
     <compareVersions>
       <version1>${installedVersion}</version1>
       <logic>greater_or_equal</logic>
       <version2>${project.version}</version2>
     </compareVersions>
   </ruleList>
</throwError>
Read value from YAML file
Read value of element from a YAML file
The allowed properties in the <yamlFileGet> action are:
-
<element>: Path expression pointing to the selected element -
<file>: Path to YAML file -
<variable>: Variable where to start the result
Examples:
To retrieve path to production database in the following YAML file to application_database_path variable:
production:
  adapter: sqlite3
  database: db/production.sqlite3
  pool: 5
  timeout: 5000
You can use:
<yamlFileGet>
    <element>/production/database</element>
    <file>${installdir}/config/database.yml</file>
    <variable>application_database_path</variable>
</yamlFileGet>
Set value in YAML file
Set the value of an element in a YAML file
The allowed properties in the <yamlFileSet> action are:
Examples:
To modify path to database in a YAML file:
production:
  adapter: sqlite3
  database: db/production.sqlite3
  pool: 5
  timeout: 5000
You can use:
<yamlFileSet>
    <element>/production/database</element>
    <file>${installdir}/config/database.yml</file>
    <value>db/otherpath.sqlite3</value>
</yamlFileSet>
Substitute Text in File
Substitute a value in a file.
The allowed properties in the <substitute> action are:
-
<encoding>: Encoding of the files to substitute -
<excludeFiles>: Patterns to exclude files -
<files>: File patterns to apply action to -
<matchHiddenFiles>: Whether or not to attempt to match Windows hidden files -
<type>: Type of substitution, regular expression or exact -
<substitutionList>: List of patterns/values for a substitution
Examples:
<substitute>
    <files>${installdir}/conf/*</files>
    <type>exact</type>
    <substitutionList>
       <substitution pattern="PATH_PLACEHOLDER" value="${installdir.unix}" />
       <substitution pattern="PORT_PLACEHOLDER" value="${server_port}" />
    </substitutionList>
</substitute>
As the text to match is known, the code uses the exact <type>, which makes the action work faster.
<substitute>
    <files>${installdir}/apache2/conf/httpd.conf</files>
    <type>regexp</type>
    <substitutionList>
       <substitution pattern="\s*Listen\s+[0-9]+" value="${apache_port}"/>
    </substitutionList>
</substitute>
As the port is unknown, we use the regexp <type>.
Add Directories to the Uninstaller
This action allows you to add new directories to the uninstaller, so they will be removed during the uninstallation process. The uninstaller just takes care of deleting those files unpacked in the installation step. If your installer generates new files at runtime or copies unpacked files to other locations you can use the <addDirectoriesToUninstaller> (and <addFilesToUninstaller>) to make the uninstaller also delete them in the uninstallation stage. The directories to add must exists at the time the action is executed or it will just skip.
The allowed properties in the <addDirectoriesToUninstaller> action are:
-
<addContents>: Whether or not to add directory contents to the uninstaller -
<excludeFiles>: Patterns to exclude files -
<files>: File patterns to apply action to -
<matchHiddenFiles>: Whether or not to attempt to match Windows hidden files
Examples:
<createDirectory>
  <path>${installdir}/config</path>
</createDirectory>
<addDirectoriesToUninstaller>
  <files>${installdir}/config</files>
</addDirectoriesToUninstaller>
As just the directory and not its contents were added, the uninstaller will just delete the directory if it is empty. This way your user can preserve the configuration files stored in that directory.
<copyFile>
  <origin>${installdir}/data</origin>
  <destination>${installdir}/backup</destination>
</copyFile>

<addDirectoriesToUninstaller>
  <files>${installdir}/data</files>
  <addContents>1</addContents>
  <matchHiddenFiles>1</matchHiddenFiles>
</addDirectoriesToUninstaller>
If new files are added to the ${installdir}/data folder, the uninstaller won’t delete them, just those files registered will be removed. This is how the uninstaller works for the unpacked files. Take into account that adding a directory with a big number of files and nested directories could take some time to finish as the action must locate all the files to add.
Add Files to Uninstaller
This action allows you to add new files to the uninstaller, so they will be removed during the uninstallation process. This action behaves the same way the <addDirectoriesToUninstaller> does but is intended to files. If the action is used with directories, the uninstaller will delete them regardless of the changes in its contents.
The allowed properties in the <addFilesToUninstaller> action are:
-
<excludeFiles>: Patterns to exclude files -
<files>: File patterns to apply action to -
<matchHiddenFiles>: Whether or not to attempt to match Windows hidden files
Examples:
<addFilesToUninstaller>
   <files>${installdir}/*~
${installdir}/*/*~
${installdir}/*/*/*~
${installdir}/*/*/*/*~</files>
</addFilesToUninstaller><addFilesToUninstaller>
<files>${installdir}/someDirectory/</files>
</addFilesToUninstaller>The action will make the uninstaller delete the ${installdir}/someDirectory/ directory even if new files are added. In addition, as the action does not care about the contents of the directory, it is much more faster.
Remove Files from Uninstaller
This action allows you to remove files or directories from the uninstaller, so they will not be removed during the uninstallation process. This action is used when some files unpacked by the installer (so they are automatically marked to be uninstalled) must be preserved after uninstalling.
The allowed properties in the <removeFilesFromUninstaller> action are:
-
<excludeFiles>: Patterns to exclude files -
<files>: File patterns to apply action to -
<matchHiddenFiles>: Whether or not to attempt to match Windows hidden files
Examples:
licenses of ${installdir} from list of items to uninstall<postInstallationActionList>
<removeFilesFromUninstaller>
<files>${installdir}/licenses</files>
</removeFilesFromUninstaller>
</postInstallationActionList>Additional Examples:
Example 1
Flow Control Actions
Foreach
Iterate over a set of values and execute a given set of actions
The allowed properties in the <foreach> action are:
-
<values>: Space-separated values to iterate over -
<variables>: Space-separated list of variables that will be assigned a value with each iteration -
<actionList>: List of actions
Examples:
  <labelParameter>
     <name>summary</name>
     <title>Summary</title>
     <explanation></explanation>
     <preShowPageActionList>
        <setInstallerVariable>
           <name>text</name>
           <value>You are about to install ${project.fullName}.

Please review the below information:

Installation Directory: ${installdir}

Username: ${username}

License File: ${license_file}

Installed Componets:
</value>
        </setInstallerVariable>
        <foreach>
           <variables>component</variables>
           <values>component1 component2 component3</values>
           <actionList>
              <!-- Just include selected Components -->
              <continue>
                <ruleList>
                   <isFalse>
                     <value>${component(${component}).selected}</value>
                   </isFalse>
                </ruleList>
              </continue>
              <setInstallerVariable>
                <name>text</name>
                <value>${text}

${component(${component}).description}</value>
              </setInstallerVariable>
           </actionList>
        </foreach>
     </preShowPageActionList>
</labelParameter><foreach>
<variables>name variable</variables>
<values>Version oldVersion Location ondInstalldir Language installationLanguage</values>
<actionList>
<registryGet>
<key>HKEY_LOCAL_MACHINE\Software\${project.windowsSoftwareRegistryPrefix}</key>
<name>${name}</name>
<variable>${variable}</variable>
</registryGet>
</actionList>
</foreach>While
Execute a group of actions as long as conditions are met
The allowed properties in the <while> action are:
-
<conditionRuleEvaluationLogic>: Condition rule evaluation logic -
<actionList>: List of actions -
<conditionRuleList>: List of conditions
Examples:
<while>
  <actionList>
    <showWarning>
      <text>The application "myapp.exe" is still running, please close it and click ok</text>
    </showWarning>
  </actionList>
  <conditionRuleList>
    <processTest>
      <logic>is_running</logic>
      <name>My Application with long filename.exe</name>
    </processTest>
  </conditionRuleList>
</while>If / Else
Conditionally execute a group of actions
The allowed properties in the <if> action are:
-
<conditionRuleEvaluationLogic>: Condition rule evaluation logic -
<actionList>: List of actions to execute if condition is true -
<conditionRuleList>: List of conditions -
<elseActionList>: List of actions to execute if condition is false
Examples:
<if>
  <conditionRuleEvaluationLogic>or</conditionRuleEvaluationLogic>
  <conditionRuleList>
     <platformTest type="linux"/>
     <platformTest type="osx"/>
  </conditionRuleList>
  <actionList>
     <runProgram>
        <program>${installdir}/scripts/launch.sh</program>
     </runProgram>
  </actionList>
  <elseActionList>
     <runProgram>
        <program>${installdir}/scripts/launch.bat</program>
     </runProgram>
  </elseActionList>
</if>
Continue
Continue current loop. If the <continue> action it is executed outside a loop (a <while> or a <foreach>) it will throw an error.
Examples:
<foreach>
   <variables>dir</variables>
   <values>${installdir}/data ${installdir}/conf ${installdir}/samples</values>
   <actionList>
     <continue>
       <ruleList>
         <fileTest path="${dir}" condition="is_empty"/>
       </ruleList>
     </continue>
     <copyFile>
        <origin>${dir}</origin>
        <destination>${installdir}/backup</destination>
     </copyFile>
   </actionList>
</foreach>Break
Break current loop. If the <continue> action it is executed outside a loop (a <while> or a <foreach>) it will throw an error.
Examples:
<startWindowsService>
    <abortOnError>0</abortOnError>
    <displayName>myservice</displayName>
    <serviceName>My Service</serviceName>
</startWindowsService>
<setInstallerVariable name="time" value="0"/>
<while>
  <actionList>
    <!-- Break the loop if port is freed -->
    <break>
      <ruleList>
        <windowsServiceTest service="myService" condition="is_running"/>
      </ruleList>
    </break>
    <!-- Wait a second to avoid using too much cpu -->
    <wait ms="1000"/>
    <mathExpression>
      <text>${time}+1000</text>
      <variable>time</variable>
    </mathExpression>
  </actionList>
  <conditionRuleList>
    <!-- Iterate until the timeout reach 30 sec (30000msec) -->
    <compareValues>
      <value1>${time}</value1>
      <logic>less_or_equal</logic>
      <value2>30000</value2>
    </compareValues>
  </conditionRuleList>
</while>OSX-specific actions
Change OSX file attributes
Change OSX attributes of a file or directory. Trying to set an attribute on a read only file will result in a failure. Make sure the file is writable before attempting to change any attribute other than, of course, readOnly
The allowed properties in the <changeOSXAttributes> action are:
-
<creator>: Creator to set to file or directory -
<excludeFiles>: Patterns to exclude files -
<files>: File patterns to apply action to -
<hidden>: Whether the file is visible or not -
<readOnly>: Whether the file is read only or writable -
<type>: Type to set to file or directory
The <hidden> and <readOnly> tags allow specifying a boolean value (0 or 1) or unchanged, to preserve the current value of the attribute. You can check the result of the action using the OS X command /Developer/Tools/GetFileInfo:
$> /Developer/Tools/GetFileInfo path/to/someFileExamples:
<changeOSXAttributes>
    <creator>doug</creator>
    <files>${installdir}/conf/*</files>
    <type>TEXT</type>
    <hidden>1</hidden>
    <readOnly>unchanged</readOnly>
</changeOSXAttributes>readOnly file<!-- The file must be first to be writable -->
<changeOSXAttributes>
<files>${installdir}/some/file</files>
<readOnly>0</readOnly>
</changeOSXAttributes>
<!-- Then we change the attributes -->
<changeOSXAttributes>
<files>${installdir}/some/file</files>
<creator>jhon</creator>
<readOnly>unchanged</readOnly>
</changeOSXAttributes>
<!-- Then we revert the readOnly attribute -->
<changeOSXAttributes>
<files>${installdir}/some/file</files>
<readOnly>1</readOnly>
</changeOSXAttributes>Java Actions
Autodetect Java
Autodetects an existing Java (tm) installation in the system and creates corresponding installer variables: java_executable java_vendor java_version java_version_major java_version_full java_bitness. If a valid java version was found, the variable java_autodetected will be set to 1
The allowed properties in the <autodetectJava> action are:
-
<promptUser>: Prompt user to choose appropriate version -
<selectionOrder>: Order of the Java versions detected -
<validVersionList>: List of supported Java versions
You can find additional information in the Java section.
Examples:
<autodetectJava>
  <promptUser>0</promptUser>
  <validVersionList>
     <validVersion>
        <vendor>sun</vendor>
        <minVersion>1.4</minVersion>
        <maxVersion>1.5</maxVersion>
     </validVersion>
  </validVersionList>
</autodetectJava>Create Launchers
Creates one or more Java launchers in specified location.
The allowed properties in the <createJavaLaunchers> action are:
-
<destination>: Path to the location where you want to create the launchers. -
<javaLauncherList>: List of launchers to create.
You can find additional information in the Java Launchers section. Examples:
<createJavaLaunchers>
  <destination>${installdir}/launchers</destination>
  <javaLauncherList>
    <javaLauncher>
      <binaryName>myLauncher</binaryName>
      <jarFile>testapplication.jar</jarFile>
    </javaLauncher>
  </javaLauncherList>
</createJavaLaunchers>Installer Actions
Encode base64
Encode a string using base64.
The allowed properties in the <encodeBase64> action are:
-
<text>: Text to process -
<variable>: Variable to save the final result to.
Examples:
<encodeBase64>
    <text>This is some secret text to encode</text>
    <variable>${secretEncodedText}</variable>
</encodeBase64>
Decode base64
Decode a string using base64.
The allowed properties in the <decodeBase64> action are:
-
<text>: Text to process -
<variable>: Variable to save the final result to.
Examples:
<decodeBase64>
    <text>${secretEncodedText}</text>
    <variable>${result}</variable>
</decodeBase64>
MD4
Generate a MD4 from a given text.
The allowed properties in the <md4> action are:
-
<text>: Text to calculate the MD4 on. -
<useNTLMFormat>: Whether or not to create an NTLM compilant hash -
<variable>: Variable to which to save the MD4 to.
This action uses the RSA Data Security, Inc. MD4 Message Digest Algorithm.
Examples:
<md4>
    <text>${password}</text>
    <variable>result</variable>
</md4>
MD5
Generate a MD5 from a given text.
The allowed properties in the <md5> action are:
-
<text>: Text to calculate the MD5 on. -
<variable>: Variable to which to save the MD5 to.
This action uses the RSA Data Security, Inc. MD5 Message Digest Algorithm.
Examples:
<readFile>
  <path>${installdir}/keys.txt</path>
  <name>data</name>
</readFile>
<md5>
  <text>${data}</text>
  <variable>result</variable>
</md5>
<throwError>
   <text>The file has been corrupted!</text>
   <ruleList>
     <compareText>
       <text>${result}</text>
       <logic>does_not_equal</logic>
       <value>3f62e6df4607c4be16f4946dc9fa16ca</value>
     </compareText>
   </ruleList>
</throwError>SHA-1
Generate a SHA-1 from a given text.
The allowed properties in the <sha1> action are:
-
<text>: Text to calculate the SHA-1 on. -
<variable>: Variable to which to save the SHA-1 to.
Examples:
<httpPost><sha1>
<text>${user}+thisIsAsecretKey+${password}</text>
<variable>encodedText</variable>
</sha1>
<httpPost url="http://www.example.com/checkdata.php">
<filename>${installdir}/activationUrl</filename>
<queryParameterList>
<queryParameter name="data" value="${encodedText}"/>
</queryParameterList>
</httpPost>SHA-256
Generate a SHA-256 from a given text.
The allowed properties in the <sha256> action are:
-
<text>: Text to calculate the SHA-256 on. -
<variable>: Variable to which to save the SHA-256 to.
Examples:
<httpPost><sha256>
<text>${user}+thisIsAsecretKey+${password}</text>
<variable>encodedText</variable>
</sha256>
<httpPost url="http://www.example.com/checkdata.php">
<filename>${installdir}/activationUrl</filename>
<queryParameterList>
<queryParameter name="data" value="${encodedText}"/>
</queryParameterList>
</httpPost>Math
Calculate math expression
The allowed properties in the <mathExpression> action are:
-
<variable>: Variable to save the final result to.
Examples:
<mathExpression>
    <text>sqrt(${number})</text>
    <variable>result</variable>
</mathExpression>| Supported Operators | Description |
|---|---|
- + ~ ! |
Unary minus, unary plus, bit-wise NOT, logical NOT |
* / % |
Multiply, divide, remainder |
+ - |
Add and subtract |
<< >> |
Left and right shift |
< > ⇐ >= |
Relational operators |
eq ne |
Compare two strings for equality (eq) or inequality (ne) |
in ni |
Compare two operators for checking if a string is contained in a list (in) or not (ni) |
abs, acos, asin, atan, atan2, bool, ceil, cos, cosh, double, entier, exp, floor, fmod, hypot, int, isqrt, log, log10, max, min, pow, round, sin, sinh, sqrt, srand, tan, tanh, wide
Additional Examples:
Example 1
Add Choice Options
Add options to an existing choice parameter
The allowed properties in the <addChoiceOptions> action are:
-
<name>: Name of an existing choice parameter. -
<optionList>: List of options to give to a choice parameter
Examples:
language. <addChoiceOptions>
<name>language</name>
<optionList>
<option>
<value>en</value>
<text>English</text>
</option>
<option>
<value>es</value>
<text>Spanish</text>
</option>
</optionList>
</addChoiceOptions>Each <option> specifies an additional option to be added to a <choiceParameter>.
Add Choice Options from Text
Add options to an existing choice parameter from a given text
The allowed properties in the <addChoiceOptionsFromText> action are:
Examples:
language. <addChoiceOptionsFromText>
<name>language</name>
<text>
jp=Japanese
jp.description=Language spoken in Japan
de=German
de.description=Language spoken in Germany
it=Italian
it.description=Language spoken in Italy
pl=Polish
pl.description=Language spoken in Poland
ru=Russian
ru.description=Language spoken in Russia
</text>
</addChoiceOptionsFromText>The keys in the text will be used to set the <value> property of option. The key value (the righthand side) will be used to set the <text> property.
Optionally, if a key has a .description suffix and matches an existing <value>, the key value will be used to set the <description> property.
Remove Choice Options
Clear choice values for a parameter
The allowed properties in the <removeChoiceOptions> action are:
Examples:
<removeChoiceOptions>
   <name>language</name>
   <options>es,en</options>
</removeChoiceOptions>
This action can take a single option to remove or multiple options, which are separated using comma.
Generate Random Value
Generate a random value.
The allowed properties in the <generateRandomValue> action are:
-
<length>: Character length for the generated value. -
<variable>: Variable to which to save the generated value.
Examples:
<generateRandomValue>
   <length>5</length>
   <variable>suffix</variable>
</generateRandomValue>
<setInstallerVariable name="${installdir}/.tmp${suffix}"/>
Additional Examples:
Example 1
Action Group
Group a set of actions.
The allowed properties in the <actionGroup> action are:
-
<actionList>: List of actions to be grouped
Examples:
   <actionGroup>
     <actionList>
       <readFile>
         <path>${installdir}/notes.txt</path>
         <name>text</name>
       </readFile>
       <showText>
          <title>InstallBuilder Notes</title>
          <width>500</width>
          <height>600</height>
          <text>${text}</text>
       </showText>
     </actionList>
     <ruleList>
        <isTrue value="${viewNotes}"/>
     </ruleList>
</actionGroup>Log Message
Write a message to the installation log. Useful for debugging purposes.
The allowed properties in the <logMessage> action are:
-
<enableTimeStamp>: Whether to enable timestamp in the message or not. -
<text>: Message to include in log -
<timeStampFormat>: Format string for the optional timestamp. The string allows a number of field descriptors.
Examples:
<logMessage>
   <text>Starting MySQL...</text>
</logMessage>
<runProgram>
    <program>${installdir}/ctlscript.sh</program>
    <programArguments>start mysql</programArguments>
</runProgram>
<logMessage>
   <text>MySQL started!</text>
</logMessage>Component Selection
Select or deselect components for installation.
The allowed properties in the <componentSelection> action are:
-
<deselect>: Comma separated list of components you wish to deselect for installation. -
<select>: Comma separated list of components you wish to select for installation.
Examples:
<componentSelection>
   <deselect>minimumDoc</deselect>
   <select>fullDocs,core,images</select>
   <ruleList>
     <compareText text="${installationMode}" logic="equals" value="full"/>
   </ruleList>
</componentSelection>
<componentSelection>
   <deselect>fullDocs,images</deselect>
   <select>minimumDoc,core</select>
   <ruleList>
     <compareText text="${installationMode}" logic="equals" value="minimal"/>
   </ruleList>
</componentSelection>Mark variables as global
Mark a list of variables as global. Global variables defined or modified inside custom actions preserve their values after the execution while regular variables are not visible outside.
The allowed properties in the <globalVariables> action are:
-
<names>: Variable names
Examples:
<project>
 ...
 <functionDefinitionList>
  <actionDefinition>
    <name>getUniquePath</name>
      <actionList>
         <globalVariables names="${variable}"/>
         <if>
           <conditionRuleList>
             <fileExists path="${root}" negate="1"/>
           </conditionRuleList>
           <actionList>
              <setInstallerVariable name="${variable}" value="${root}"/>
           </actionList>
           <elseActionList>
             <setInstallerVariable name="suffix" value="0"/>
             <setInstallerVariable name="candidate" value="${root}.${suffix}"/>
             <while>
               <actionList>
                 <mathExpression>
                   <text>${suffix}+1</text>
                   <variable>time</variable>
                 </mathExpression>
                 <setInstallerVariable name="candidate" value="${root}.${suffix}"/>
               </actionList>
               <conditionRuleList>
                 <fileExists path="${root}"/>
               </conditionRuleList>
             </while>
             <setInstallerVariable name="${variable}" value="${candidate}"/>
           </elseActionList>
         </if>
      </actionList>
      <parameterList>
         <stringParameter name="variable" value="" default=""/>
         <stringParameter name="root" value="" default=""/>
      </parameterList>
  </actionDefinition>
 </functionDefinitionList>
 ...
 <initializationActionList>
   <getUniquePath root="${installdir}/.conf" variable="uniquepath"/>
 </initializationActionList>
 ...
</project>
You can find additional information in the Global Variables section.
Set Variable from Program
Set a installer variable to the output of a script. If the name of the variable matches a parameter name, the value of the parameter will be updated.
The allowed properties in the <setInstallerVariableFromScriptOutput> action are:
-
<exec>: Path to the script to run -
<execArgs>: Arguments to pass to the script -
<name>: Name of the variable to set -
<workingDirectory>: Working directory. This is important for scripts that expect to be run from a specific location
Examples:
<setInstallerVariableFromScriptOutput>
    <exec>find</exec>
    <execArgs>${directory} -name '*.txt'</execArgs>
    <name>files</name>
    <ruleList>
       <platformTest type="linux"/>
    </ruleList>
</setInstallerVariableFromScriptOutput>Wait
Pause the installation for given time
The allowed properties in the <wait> action are:
-
<ms>: Number of milliseconds to wait
Examples:
<startWindowsService>
   <serviceName>myService</serviceName>
   <displayName>My Service</displayName>
</startWindowsService>
<wait>
   <ms>30000</ms>
</wait>
<showWarning>
   <text>The service 'My Service' could not be started</text>
   <ruleList>
     <windowsServiceTest service="myService" condition="is_not_running"/>
   </ruleList>
</showWarning>
Additional Examples:
Example 1
Exit Installer
Exit the installer/uninstaller.
The allowed properties in the <exit> action are:
-
<exitCode>: exit code returned by the installer/uninstaller
Examples:
<preUninstallationActionList>
  <actionGroup>
    <actionList>
      <showWarning>
        <text>You must close the application ${project.fullName}
        before launching the uninstaller</text>
      </showWarning>
      <exit exitCode="1"/>
    </actionList>
    <ruleList>
       <processTest name="${project.fullName}.exe" logic="is_running" />
    </ruleList>
  </actionGroup>
</preUninstallationActionList>>
Please note that on Windows the uninstaller will always exit with exit code 0.
Modify a String
This action allows you to transform a given text using one of the allowed string manipulation methods.
The allowed properties in the <stringModify> action are:
-
<logic>: Transformation to perform. -
<text>: Text which will be transformed. -
<variable>: Variable name which will store the result.
Examples:
<stringModify>
   <text>${identifier}</text>
   <logic>tolower</logic>
   <variable>identifier</variable>
</stringModify>
<stringModify>
   <text>${identifier}</text>
   <logic>trim</logic>
   <variable>identifier</variable>
</stringModify>
Set Installer Variable
Set a installer variable. If the name of the variable matches a parameter name, the value of the parameter will be updated.
The allowed properties in the <setInstallerVariable> action are:
Examples:
${installdir} child directory<setInstallerVariable>
<name>dataDir</name>
<value>${installdir.dos}/data</value>
</setInstallerVariable>Set Variable from Regular Expression
Set a installer variable to the result of a regular expression. If the name of the variable matches a parameter name, the value of the parameter will be updated.
The allowed properties in the <setInstallerVariableFromRegEx> action are:
-
<name>: Name of the variable to set -
<pattern>: Pattern to match -
<substitution>: Value to replace matched text with -
<text>: Text to match
Examples:
<setInstallerVariableFromRegEx>
    <name>extension</name>
    <pattern>.*\.([^\.]+)$</pattern>
    <substitution>\1</substitution>
    <text>${filename}</text>
</setInstallerVariableFromRegEx><readFile>
<name>text</name>
<path>${installdir}/log/my.log</path>
</readFile>
<while>
<actionList>
<setInstallerVariableFromRegEx>
<name>line</name>
<pattern>^([^\n]*)(\n|$).*</pattern>
<substitution>\1</substitution>
<text>${text}</text>
</setInstallerVariableFromRegEx>
<setInstallerVariableFromRegEx>
<name>text</name>
<pattern>^[^\n]*(\n|$)(.*)</pattern>
<substitution>\2</substitution>
<text>${text}</text>
</setInstallerVariableFromRegEx>
<actionGroup>
<ruleEvaluationLogic>or</ruleEvaluationLogic>
<actionList>
<!-- custom processing -->
<consoleWrite>
<text>LINE: ${line}
</text>
</consoleWrite>
<!-- end custom processing -->
</actionList>
</actionGroup>
</actionList>
<conditionRuleList>
<regExMatch>
<logic>matches</logic>
<pattern>[^\n]+.*(\n|$)</pattern>
<text>${text}</text>
</regExMatch>
</conditionRuleList>
</while>Specify encryption password
Specifies and verifies password to use for copying files from installer
The allowed properties in the <setEncryptionPassword> action are:
-
<password>: Password to use; action will throw error if password specified does not match password from build time
Examples:
MYAPP_HOME environment variable to directory where application is installed.<setEncryptionPassword>
<password>...</password>
</setEncryptionPassword>Dialog Actions
Show Password Question
This action allows you to ask the user to provide a password in a popup window.
The allowed properties in the <showPasswordQuestion> action are:
-
<text>: Question message that will be shown. -
<title>: Dialog window title. -
<variable>: Variable name where the password will be stored.
The password will not be echoed back to the user in text mode installations and will be substituted by * characters in GUI mode installations.
Examples:
  <preUninstallationActionList>
    <showPasswordQuestion>
        <title>Password Required</title>
        <text>Please provide you MySQL password</text>
        <variable>pass</variable>
    </showPasswordQuestion>
    <runProgram>
       <program>mysqldump</program>
       <programArguments>--opt --user=${username} --password=${pass.password} ${databaseName} > ${backupFolder}/dump.sql</programArguments>
     </runProgram>
  </preUninstallationActionList>
Show Info Dialog
Prompt an info dialog to the user.
The allowed properties in the <showInfo> action are:
Examples:
<showInfo>
   <text>Thank you for installing ${project.fullName}!</text>
   <title>Installation Finished!</title>
</showInfo>Show Text Dialog
Display a read-only text dialog to the user.
The allowed properties in the <showText> action are:
-
<fixedFont>: Show text with monospaced font -
<height>: Text window height -
<htmlText>: HTML text that will be shown in Qt mode. Note that regular text still needs to be provided in case the installer is run in another mode -
<text>: Text that will be shown. -
<title>: Dialog title. -
<width>: Text window width
Examples:
<finalPageActionList>
   <showText>
      <progressText>View Notes</progressText>
      <title>InstallBuilder Notes</title>
      <width>500</width>
      <height>600</height>
      <text>InstallBuilder is a development tool for
building crossplatform installers for desktop and server software.
 With InstallBuilder, you can quickly create professional installers
for Linux, Windows, Mac OS X, Solaris and other platforms from a single
project file and build environment. In addition to installers,
InstallBuilder will generate RPM and Debian packages and multiplatform
CDs/DVDs. Its new automatic update functionality makes it easy to deliver
 updates directly to your users once they have your software installed.
...</text>
   </showText>
</finalPageActionList>
If you are using InstallBuilder for Qt, the <showText> will be also able to display HTML text when executing in qt mode. Please note you should still provide a plain text to display in other modes:
<finalPageActionList>
<showText>
<progressText>View Notes</progressText>
<title>InstallBuilder Notes</title>
<width>500</width>
<height>600</height>
<htmlText><h1>This is HTML text</h1>
<p>The supported platforms are:
<ul>
<li><b>Linux</b></li>
<li><b>Windows</b></li>
<li><b>OS X</b></li>
<li><b>...</b></li>
</ul>
</p>
</htmlText>
<text>Some long plain text...</text>
</showText>
</finalPageActionList>If the HTML text is read from a file at runtime, you don’t have to escape it:
<finalPageActionList>
   <actionGroup progressText="View Notes">
     <actionList>
       <readFile>
         <path>${installdir}/notes.html</path>
         <name>htmlText</name>
       </readFile>
       <showText>
          <title>InstallBuilder Notes</title>
          <width>500</width>
          <height>600</height>
          <htmlText>${htmlText}</htmlText>
          <text>Some long plain text...</text>
       </showText>
     </actionList>
   </actionGroup>
</finalPageActionList>Show Question Dialog
Prompt a question to the user. The result is stored as yes or no in the given variable name.
The allowed properties in the <showQuestion> action are:
-
<default>: Default answer, it can be yes or no. -
<text>: Question message that will be shown. -
<title>: Title of the dialog window -
<variable>: Variable name where the result will be stored
The text in the <showQuestion> buttons can be localized modifying the language keys:
Installer.Button.Yes=Yes
Installer.Button.No=No
Examples:
  <showQuestion>
     <title>Delete Configuration</title>
     <text>Are you sure you want to delete the
     configuration files?</text>
     <variable>answer</variable>
     <default>yes</default>
</showQuestion>Show Progress Dialog
Launch a popup dialog window which displays an indeterminate progress bar to process a list of actions. In text mode frontend, it will display a character-based animation.
The allowed properties in the <showProgressDialog> action are:
-
<height>: Popup window height -
<title>: Title of the progress dialog window -
<width>: Popup window width -
<actionList>: Actions to Execute
Examples:
<showProgressDialog>
    <title>Please wait while database is installed</title>
    <actionList>
        <runProgram>
            <program>${installdir}/db/setup-database</program>
            <programArguments>--silent</programArguments>
            <workingDirectory>${installdir}/db</workingDirectory>
        </runProgram>
    </actionList>
</showProgressDialog>Show Warning
This action allows you to display a message in a warning dialog.
The allowed properties in the <showWarning> action are:
Examples:
<showWarning>
   <text>The selected installation directory is not empty!</text>
   <title>Directory not empty</title>
   <ruleList>
      <fileTest path="${installdir}" condition="is_not_empty"/>
   </ruleList>
</showWarning>Show Choice Dialog
Prompt a choice question dialog to the user.
The allowed properties in the <showChoiceQuestion> action are:
-
<defaultValue>: Default value -
<text>: Information message that will be shown -
<title>: Dialog title -
<variable>: Variable to store choice -
<optionList>: Predefined list of options that allows the user to select a value
The text in the <showChoiceQuestion> buttons can be localized modifying the language keys:
Installer.Button.OK=OK
Installer.Button.Cancel=Cancel
Examples:
  <preUninstallationActionList>
     ...
     <showChoiceQuestion>
       <defaultValue>keep</defaultValue>
       <text>Do you want to keep your configuration files?</text>
       <variable>answer</variable>
       <optionList>
          <option>
             <description>Does not delete the configuration files</description>
             <text>Keep configuration files</text>
             <value>keep</value>
          </option>
          <option>
             <description>Deletes the configuration files</description>
             <text>Delete configuration files</text>
             <value>delete</value>
          </option>
       </optionList>
     </showChoiceQuestion>
     <deleteFile path="${installdir}/configuration" >
        <ruleList>
           <compareText text="${answer}" logic="equals" value="delete"/>
        </ruleList>
     </deleteFile>
     ...
  </preUninstallationActionList>
If the user cancels the dialog, either clicking Cancel or closing the popup, the result variable will be set to empty. If the user clicks Ok, the result variable will be set to the selected choice item. This behavior can be used to validate the user input:
  <preUninstallationActionList>
     ...
     <while>
        <actionList>
            <showChoiceQuestion>
                <defaultValue>keep</defaultValue>
                <text>Do you want to keep your configuration files?</text>
                <variable>answer</variable>
                <optionList>
                    <option>
                        <description>Does not delete the configuration files</description>
                        <image></image>
                        <text>Keep configuration files</text>
                        <value>keep</value>
                    </option>
                    <option>
                        <description>Deletes the configuration files</description>
                        <image></image>
                        <text>Delete configuration files</text>
                        <value>delete</value>
                    </option>
                </optionList>
            </showChoiceQuestion>
            <break>
                <ruleList>
                    <compareText text="${answer}" logic="does_not_equal" value=""/>
                </ruleList>
            </break>
            <showWarning>
                <text>You must select an Option!</text>
            </showWarning>
        </actionList>
    </while>
    ...
  </preUninstallationActionList>
Throw Error
Generate an error inside the installer so the installer will exit. The only exception to this is when abortOnError equals zero or the action is inside a validationActionList, in which case it will prompt an error dialog to the user, but will not exit the installer.
The allowed properties in the <throwError> action are:
-
<text>: Error message
Examples:
<initializationActionList>
   <throwError>
      <text>The installer requires Admin privileges. Aborting...</text>
      <ruleList>
        <isFalse value="${installer_is_root_install}"/>
      </ruleList>
   </throwError>
</initializationActionList>Show String Question
This action allows you to ask the user a question in a popup window.
The allowed properties in the <showStringQuestion> action are:
-
<text>: Question message that will be shown. -
<title>: Dialog window title. -
<variable>: Variable name where the answer will be stored.
Examples:
  <showStringQuestion>
     <title>Username</title>
     <text>Please introduce your username:</text>
     <variable>username</variable>
  </showStringQuestion>
Write text to console
Write text to console
The allowed properties in the <consoleWrite> action are:
-
<text>: Text to write
Examples:
<consoleWrite>
    <text>Unable to install database in directory ${installdir}</text>
</consoleWrite>
Validated Action Group
Validates a group of actions and if an error occurs, display a configurable abort-retry dialog
The allowed properties in the <validatedActionGroup> action are:
-
<severity>: Severity of the dialog -
<text>: message that will be shown. -
<type>: Dialog type -
<actionList>: List of actions to be grouped
Examples:
<postInstallationActionList>
    ...
    <validatedActionGroup>
        <severity>warning</severity>
        <text>The application failed to launch. Do you want to retry?</text>
        <type>abortRetry</type>
        <actionList>
            <runProgram>
                <workingDirectory>${installdir}/scripts</workingDirectory>
                <program>./launch.sh</program>
            </runProgram>
        </actionList>
    </validatedActionGroup>
    ...
</postInstallationActionList>
Registry Actions
Registry Find Key
Retrieve the first registry hive and content matching a certain expression and store it as a list in an installer variable. If no match is found the variable will be created empty.
The allowed properties in the <registryFind> action are:
-
<dataPattern>: Pattern to match in the value -
<findAll>: Whether to look for the first occurrence or for all -
<keyPattern>: Pattern to match key name with -
<namePattern>: Pattern to match entry name with -
<rootKey>: Root key from which start the search -
<searchDepth>: Maximum depth of the search. 0 will look just in the Root Key -
<variable>: Variable name to store the results -
<wowMode>: Determines whether we want to access a 32-bit or 64-bit view of the Registry
Examples:
<registryFind>
    <findAll>1</findAll>
    <keyPattern>*</keyPattern>
    <namePattern>DisplayName</namePattern>
    <rootKey>HKEY_LOCAL_MACHINE\SOFTWARE\Microsoft\Windows\CurrentVersion\Uninstall</rootKey>
    <searchDepth>1</searchDepth>
    <variable>installedApplications</variable>
</registryFind>
<setInstallerVariable>
    <name>text</name>
    <value></value>
</setInstallerVariable>
<foreach>
    <values>${installedApplications}</values>
    <variables>key name value</variables>
    <actionList>
        <registryGet>
            <key>${key}</key>
            <name>Publisher</name>
            <variable>publisher</variable>
        </registryGet>
        <actionGroup>
            <actionList>
                <md5 text="${key}" variable="md5"/>
                <setInstallerVariable>
                    <name>text</name>
                    <value>${text}
${md5}=${value}</value>
                </setInstallerVariable>
            </actionList>
            <ruleList>
                <compareText>
                    <logic>equals</logic>
                    <text>${publisher}</text>
                    <value>${project.vendor}</value>
                </compareText>
            </ruleList>
        </actionGroup>
    </actionList>
</foreach>
Action <registryFind> returns all keys from specified subtree matching specified pattern for key.
Registry Get Matching Key Value
Store the value of the first match of a registry key matching a certain expression in an installer variable. If the key or name does not exist, then the variable will be created empty. The name can contain a wildcard expression (using *)
The allowed properties in the <registryGetMatch> action are:
-
<key>: Registry key -
<name>: Entry name to read value from -
<variable>: Variable name to store registry value to -
<wowMode>: Determines whether we want to access a 32-bit or 64-bit view of the Registry
Examples:
<registryGetMatch>
  <key>HKEY_LOCAL_MACHINE\SOFTWARE\${project.vendor}\${project.fullName}</key>
  <name>Loc*</name>
  <variable>location</variable>
</registryGetMatch>
Additional Examples:
Example 1
Delete Registry Key
Delete a registry entry. If the entry to delete is only a registry key and it does not exist, the action will be ignored. Deleting a registry value (key + name combination) that does not exist will trigger a regular error.
The allowed properties in the <registryDelete> action are:
Examples:
<registryDelete>
    <key>HKEY_LOCAL_MACHINE\Software\${project.vendor}\${project.fullName}</key>
    <name>Timestamp</name>
</registryDelete>Set Registry Key Value
Create a new registry key or modify the value of an existing registry key.
The allowed properties in the <registrySet> action are:
Examples:
<registrySet>
    <key>HKEY_LOCAL_MACHINE\Software\${project.vendor}\${project.fullName}</key>
    <name>Timestamp</name>
    <value>${installer_builder_timestamp}</value>
</registrySet>
Additional Examples:
Example 1
Get Registry Key Name
Store in variable the first registry key that matches the given pattern, or set the variable to empty otherwise. The search is case-sensitive for the whole key provided.
The allowed properties in the <registryGetKey> action are:
-
<key>: Registry key -
<variable>: Variable to store result -
<wowMode>: Determines whether we want to access a 32-bit or 64-bit view of the Registry
Examples:
${project.vendor}<registryGetKey>
<key>HKEY_LOCAL_MACHINE\SOFTWARE\${project.vendor}\*</key>
<variable>application</variable>
</registryGetKey>Additional Examples:
Example 1
Get Registry Key Value
Store the value of a registry key in an installer variable. If the key or name does not exist, then the variable will be created empty.
The allowed properties in the <registryGet> action are:
-
<key>: Registry key -
<name>: Entry name to read value from -
<variable>: Variable name to store registry value to -
<wowMode>: Determines whether we want to access a 32-bit or 64-bit view of the Registry
Examples:
<registryGet>
    <key>HKEY_LOCAL_MACHINE\SOFTWARE\Microsoft\Windows\CurrentVersion\App Paths\chrome.exe</key>
    <name>Path</name>
    <variable>chrome_home</variable>
</registryGet>
The <registryGet> actions reads App Paths for chrome.exe from Microsoft Windows registry. If chrome.exe is not installed or properly registered, chrome_home variable will be set to empty string.
Windows-specific actions
Change Resource Information
Change resource information of a Windows executable
The allowed properties in the <changeExecutableResources> action are:
-
<path>: Path to the Windows executable to modify -
<windowsResourceComments>: Comments for resources embedded in Windows executable -
<windowsResourceCompanyName>: Company Name for resources embedded in Windows executable -
<windowsResourceFileDescription>: File Description for resources embedded in Windows executable -
<windowsResourceFileVersion>: File version for resources embedded in Windows executable -
<windowsResourceInternalName>: Internal Name for resources embedded in Windows executable -
<windowsResourceLegalCopyright>: Legal Copyright for resources embedded in Windows executable -
<windowsResourceLegalTrademarks>: Legal Trademarks for resources embedded in Windows executable -
<windowsResourceOriginalFilename>: Original Filename for resources embedded in Windows executable -
<windowsResourceProductName>: Product Name for resources embedded in Windows executable -
<windowsResourceProductVersion>: Product Version for resources embedded in Windows executable
Examples:
<changeExecutableResources>
    <path>${installdir}/mylauncher.exe</path>
    <windowsResourceProductName>My Application (evaluation copy)</windowsResourceProductName>
    <ruleList>
        <stringTest>
            <text>${licenseinfo}</text>
            <type>empty</type>
        </stringTest>
    </ruleList>
</changeExecutableResources>
Autodetect .NET Framework
Autodetects an existing .NET (tm) installation in the system and creates corresponding installer variables: dotnet_version. If a valid .NET framework version was found, the variable dotnet_autodetected, will be set to 1
The allowed properties in the <autodetectDotNetFramework> action are:
-
<validDotNetVersionList>: List of supported .NET versions
Examples:
<autodetectDotNetFramework>
    <validDotNetVersionList>
        <validDotNetVersion>
            <maxVersion>3.5</maxVersion>
            <minVersion>2.0</minVersion>
        </validDotNetVersion>
    </validDotNetVersionList>
</autodetectDotNetFramework><project>
...
<componentList>
<!-- This component takes care of autodetecting an existing
installation of .NET and unpack and install the bundled one
if it is not found -->
<component>
<name>dotnet</name>
<description>ServiceEx</description>
<canBeEdited>0</canBeEdited>
<selected>1</selected>
<show>0</show>
<folderList>
<folder>
<description>.NET installer</description>
<destination>${installdir}</destination>
<name>dotnet</name>
<platforms>windows</platforms>
<distributionFileList>
<distributionFile>
<origin>/path/to/dotnetfx.exe</origin>
</distributionFile>
</distributionFileList>
<ruleList>
<!-- The .NET installer will be unpacked on demand
so we attach a rule that will be never passed to
prevent the automatic unpack process -->
<isTrue value="0"/>
</ruleList>
</folder>
</folderList>
...
<readyToInstallActionList>
<!-- check .NET >= 2.0 is installed -->
<autodetectDotNetFramework>
<validDotNetVersionList>
<validDotNetVersion>
<maxVersion></maxVersion>
<minVersion>2.0</minVersion>
</validDotNetVersion>
</validDotNetVersionList>
</autodetectDotNetFramework>
<!-- install .NET if not found -->
<actionGroup>
<progressText>Installing .NET framework</progressText>
<actionList>
<unpackFile>
<component>dotnet</component>
<destination>${system_temp_directory}/dotnetfx.exe</destination>
<folder>dotnet</folder>
<origin>dotnetfx.exe</origin>
</unpackFile>
<runProgram>
<program>${system_temp_directory}/dotnetfx.exe</program>
<programArguments>/q:a "/c:install.exe /qb"</programArguments>
</runProgram>
<!-- Delete the .NET installer -->
<deleteFile>
<path>${system_temp_directory}/dotnetfx.exe</path>
</deleteFile>
</actionList>
<ruleList>
<isFalse>
<value>${dotnet_autodetected}</value>
</isFalse>
</ruleList>
</actionGroup>
</readyToInstallActionList>
</component>
</componentList>
...
</project>Add Shared DLL
This action allows you to increment the reference count for a shared DLL.
The allowed properties in the <addSharedDLL> action are:
-
<path>: Path to the shared DLL
Examples:
shared.dll that is located in Common Files\MyApp folder.<addSharedDLL>
<path>${windows_folder_program_files_common}/MyApp/shared.dll</path>
</addSharedDLL>Remove Shared DLL
This action allows you to decrement the reference count for a shared DLL. If it reaches zero, the file will be removed.
The allowed properties in the <removeSharedDLL> action are:
-
<path>: Path to the shared DLL
Examples:
shared.dll that is located in Common Files\MyApp folder.<removeSharedDLL>
<path>${windows_folder_program_files_common}/MyApp/shared.dll</path>
</removeSharedDLL>Change Windows file attributes
Change Windows attributes for a file or directory.
The allowed properties in the <changeWindowsAttributes> action are:
-
<archive>: Whether the file has or has not changed since the last backup. -
<excludeFiles>: Patterns to exclude files -
<files>: File patterns to apply action to -
<hidden>: Whether the file is visible or not -
<matchHiddenFiles>: Whether or not to attempt to match Windows hidden files -
<readOnly>: Whether the file is read only or writable -
<system>: Whether the file is a System file or a regular one
Examples:
*.ini files as read only and hidden<changeWindowsAttributes>
<files>${installdir}/*.ini</files>
<hidden>1</hidden>
<readOnly>1</readOnly>
</changeWindowsAttributes>Additional Examples:
Example 1
Create Windows File Associations
This action allows you to create file associations for Windows, defining commands such as "open" for a given file extension.
The allowed properties in the <associateWindowsFileExtension> action are:
-
<extensions>: Space-separated list of extensions for which the given commands will be available. -
<friendlyName>: Friendly Name for the progID. -
<icon>: Path to the icon file that contains the icon to display. -
<mimeType>: MIME type associated to all the file extensions. -
<progID>: Programmatic Identifier to which the extensions are attached, contains the available commands to be invoked on each file type. -
<scope>: Choose between system or user scope when installing the association -
<commandList>: List of commands that can be invoked on each given file type.
Examples:
.myextension extension to yourprogram.exe located in ${installdir}.<associateWindowsFileExtension>
<extensions>.myextension</extensions>
<progID>mycompany.package</progID>
<icon>${installdir}\images\myicon.ico</icon>
<mimeType>example/mycompany-package-myextension</mimeType>
<commandList>
<!-- Defining the 'Open' command -->
<command>
<verb>Open</verb>
<runProgram>${installdir}\yourprogram.exe</runProgram>
<runProgramArguments>"%1"</runProgramArguments>
</command>
</commandList>
</associateWindowsFileExtension>You can get additional information in the Windows File Associations section.
Additional Examples:
Example 1
Remove Windows File Associations
This action allows you to remove file associations for Windows, unregistering commands such as "open" for a given file extension.
The allowed properties in the <removeWindowsFileAssociation> action are:
-
<extensions>: Space-separated list of extensions to remove. -
<mimeType>: MIME type to remove, associated to all the file extensions. It must be specified if you want to delete MIME associations added previously with associateWindowsFileExtension action. -
<progID>: Programmatic Identifier to remove, to which the extensions are attached. -
<scope>: Choose between system or user scope when installing the association
Examples:
.myextension extension.<removeWindowsFileAssociation>
<extensions>.myextension</extensions>
<progID>mycompany.package</progID>
<mimeType>example/mycompany-package-myextension</mimeType>
</removeWindowsFileAssociation>You can get additional information in the Windows File Associations section.
Additional Examples:
Example 1
Wow64 File System Redirection
Modifies the Windows x64 File System Redirection behavior. It mainly redirects %Windir%System32 to %Windir%SysWOW64 for 32-bit processes running on Windows x64 systems. A similar effect is also applied to Program Files
The allowed properties in the <wow64FsRedirection> action are:
-
<action>: Whether to enable or disable the File System Redirection
Examples:
%windir%\system32 disabling redirection temporarily<wow64FsRedirection>
<action>disable</action>
</wow64FsRedirection>
<deleteFile>
<path>${windows_folder_system}/myApp.exe</path>
</deleteFile>
<wow64FsRedirection>
<action>enable</action>
</wow64FsRedirection>Additional Examples:
Example 1
Get Windows file version info
Get file information.
The allowed properties in the <getWindowsFileVersionInfo> action are:
-
<path>: Path to the file -
<type>: Type of the file info. -
<variable>: Variable to save the file info to
The <type> tag accepts the following values:
-
codepage: Returns the code page resource (language and country combination). e.g.: 0409 -
flags: Returns a bit mask specifying the boolean attributes of the file. You can get additional information here, in thedwFileFlagstable. e.g.: debug, prerelease, patched, privatebuild, infoinferred or specialbuild -
os: The operating system for what the file was built. e.g.: nt_windows32, dos -
productversion: ProductVersion from resources; e.g.: 6.1.7600.16385 -
signature: signature for the fixed part of the version resource; e.g.: 0xfeef04bd -
structversion: version of the version resource format; e.g.: 1.0 -
type:e.g.: file type; e.g.: application, dll, driver.display, font.truetype -
version:e.g.: Returns file version as from resources; e.g. 6.1.7600.16385
Examples:
<registryGet>
    <key>HKEY_LOCAL_MACHINE\SOFTWARE\Microsoft\Windows\CurrentVersion\App Paths\Winword.exe</key>
    <name></name>
    <variable>msword_binary</variable>
</registryGet>
<getWindowsFileVersionInfo>
    <path>${msword_binary}</path>
    <type>version</type>
    <variable>msword_version</variable>
</getWindowsFileVersionInfo>
Please note that this example will fail if Microsoft Office is not installed. Proper <stringTest> with <type> not_empty can be used to check msword_binary.
Clear ACL Permissions
Clear Windows ACL permissions of a file or directory
The allowed properties in the <clearWindowsACL> action are:
-
<excludeFiles>: Patterns to exclude files -
<files>: File patterns to apply action to -
<matchHiddenFiles>: Whether or not to attempt to match Windows hidden files
You can get additional information in the ACL section.
Examples:
<clearWindowsACL>
    <files>${installdir}/doscs/*</files>
</clearWindowsACL>
Additional Examples:
Example 1
Change ACL Permissions
Change Windows ACL permissions of a file or directory
The allowed properties in the <setWindowsACL> action are:
-
<action>: Whether to allow or deny permissions -
<excludeFiles>: Patterns to exclude files -
<files>: File patterns to apply action to -
<matchHiddenFiles>: Whether or not to attempt to match Windows hidden files -
<permissions>: Permissions for matching files or directories -
<recurseContainers>: Whether to apply recursively or not to container descendant -
<recurseObjects>: Whether to apply recursively or not to object descendant -
<recurseOneLevelOnly>: Just one level recursion if applicable -
<self>: Whether to apply or not to the specified file -
<users>: Comma separated list of users to modify access permissions for
You can get additional information in the ACL section.
Examples:
<clearWindowsACL>
  <files>${installdir}/admin;${installdir}/admin/*</files>
</clearWindowsACL>
<setWindowsACL>
  <action>allow</action>
  <files>${installdir}/admin;${installdir}/admin/*</files>
  <permissions>file_all_access</permissions>
  <users>S-1-5-32-544</users>
</setWindowsACL>Get ACL Permissions
Get Windows ACL permissions of a file or directory
The allowed properties in the <getWindowsACL> action are:
-
<deniedPermissions>: Variable name to save denied permissions -
<file>: File to retrieve ACL -
<grantedPermissions>: Variable name to save granted permissions -
<username>: User to retrieve ACL
You can get additional information in the ACL section.
Examples:
${installdir}/admin<getWindowsACL>
<deniedPermissions>denied</deniedPermissions>
<file>${installdir}/admin</file>
<grantedPermissions>granted</grantedPermissions>
<username>S-1-1-0</username>
</getWindowsACL>Additional Examples:
Example 1
Add Windows Scheduled Task
Create a new task or modify the value of an existing one.
The allowed properties in the <addScheduledTask> action are:
-
<dayOfMonth>: This parameter is used only for Task of MONTHLY type. It specifies the day of the month the task will be executed. -
<disallowStartIfOnBatteries>: Don’t start the task if the system is running on batteries -
<duration>: (minutes) How long the Task is active. -
<endDate>: (year-month-day) Specify the date on which the task becomes inactive. -
<executionTimeLimit>: Maximum execution time in hours -
<interval>: (minutes) How often do you want to execute the given Task in specified duration time. -
<name>: Name of the Task -
<password>: The user password associated with the account specified in runAs parameter. -
<period>: This parameter is used only for Task of DAILY/WEEKLY type. It specifies how often (every PERIOD days for type DAILY / every PERIOD weeks for type WEEKLY) the task will be executed. -
<program>: Path to program or script to run. -
<programArguments>: Program arguments. -
<runAs>: Run the Task as the specified user. -
<runAsAdmin>: Run with highest privileges. -
<runOnlyIfLoggedOn>: Run task only if the user specified by runAs parameter is logged on. -
<startDate>: (year-month-day) Specify the date on which the task becomes activated. -
<startTime>: (hours:minutes) The time the Task becomes activated. -
<type>: Type of the Task. -
<weekDays>: Specifies days to run the task on (MON, TUE, … SUN) or * for all days of week -
<workingDirectory>: Working directory. This is important for scripts that expect to be run from a specific location. By default, it will be the directory where the script or program is located.
Examples:
<addScheduledTask>
    <dayOfMonth>3</dayOfMonth>
    <duration>120</duration>
    <endDate>2037-12-31</endDate>
    <interval></interval>
    <name>myappDailyMaintenance</name>
    <password></password>
    <period></period>
    <program>${installdir}/maintenance.exe</program>
    <programArguments>--monthly</programArguments>
    <runOnlyIfLoggedOn>0</runOnlyIfLoggedOn>
    <startDate>2019-01-01</startDate>
    <startTime>03:00</startTime>
    <type>MONTHLY</type>
</addScheduledTask><addScheduledTask>
<dayOfMonth></dayOfMonth>
<duration>1440</duration>
<endDate>2037-12-31</endDate>
<interval>10</interval>
<name>myrepeatedTask</name>
<password></password>
<period></period>
<program>${installdir}/task.bat</program>
<programArguments></programArguments>
<runOnlyIfLoggedOn>0</runOnlyIfLoggedOn>
<startDate>2019-01-01</startDate>
<startTime>00:00</startTime>
<type>DAILY</type>
</addScheduledTask><!-- Check the existence of the task -->
<setInstallerVariableFromScriptOutput>
<exec>schtasks</exec>
<execArgs>/query /fo list</execArgs>
<name>output</name>
<abortOnError>0</abortOnError>
<showMessageOnError>0</showMessageOnError>
</setInstallerVariableFromScriptOutput>
<setInstallerVariable name="taskName" value="Check For Updates"/>
<setInstallerVariable name="taskExists" value="0"/>
<setInstallerVariable>
<name>taskExists</name>
<value>1</value>
<ruleList>
<regExMatch>
<logic>matches</logic>
<pattern>TaskName:\s*(${taskName})\n</pattern>
<text>${output}</text>
</regExMatch>
</ruleList>
</setInstallerVariable>
<addScheduledTask>
<program>${installdir}/autoupdate.exe</program>
<programArguments>--mode unattended --unattendedmodebehavior download</programArguments>
<startTime>09:00</startTime>
<type>DAILy</type>
<ruleList>
<isFalse value="${taskExists}"/>
</ruleList>
</addScheduledTask>Delete Windows Scheduled Task
Delete Windows Scheduled Task
The allowed properties in the <deleteScheduledTask> action are:
-
<name>: Name of the Task
Examples:
<deleteScheduledTask>
    <name>myappDailyMaintenance</name>
</deleteScheduledTask>
Shutdown
Shut down the machine (Windows only)
The allowed properties in the <shutdown> action are:
-
<delay>: Delay in seconds before shut down.
Examples:
<finalPageActionList>
  <shutdown progressText="Shutdown the machine" delay="10"/>
</finalPageActionList>
Query WMI
Query WMI and return results
The allowed properties in the <queryWMI> action are:
-
<class>: Class -
<fields>: List of fields to return -
<namespace>: Namespace -
<where>: Query to pass to WMI
Examples:
<actionGroup>
    <actionList>
        <queryWMI>
            <class>Win32_Process</class>
            <variable>result</variable>
            <fields>ProcessId;ExecutablePath</fields>
            <where>ExecutablePath LIKE '%MyApp%'</where>
        </queryWMI>
        <foreach>
            <values>${result}</values>
            <variables>result_pid result_path</variables>
            <actionList>
                <logMessage>
                    <text>Found process: ${result_path} as ${result_pid}</text>
                </logMessage>
            </actionList>
        </foreach>
    </actionList>
</actionGroup>
This will allow multiple services of same base name to be created - for example if multiple applications base on same framework that runs as a service.
Services Actions
Delete Mac OS X service
This action allows you to delete a Mac OS X service. Requires Mac OS X version 10.4 or later.
The allowed properties in the <deleteOSXService> action are:
-
<scope>: Scope of service -
<serviceName>: Identifier for the service name
Examples:
com.installbuilder.sample<deleteOSXService>
<serviceName>com.installbuilder.sample</serviceName>
<scope>system</scope>
</deleteOSXService>Additional Examples:
Example 1
Start Windows Service
This action allows you to start a specified Windows service.
The allowed properties in the <startWindowsService> action are:
-
<delay>: Amount of milliseconds to wait for the service to start. -
<displayName>: Name displayed in the Windows service control panel -
<serviceName>: Internal service name
Examples:
Sample Service service<startWindowsService>
<abortOnError>0</abortOnError>
<delay>15000</delay>
<displayName>Sample Service</displayName>
<serviceName>SampleService</serviceName>
</startWindowsService>Additional Examples:
Example 1
Create Windows Service
This action allows you to create a new Windows service.
The allowed properties in the <createWindowsService> action are:
-
<account>: User account under which the service should run. It takes the form domain\username. If the account is a local account, it may be specified as .\username or username. If this option is not specified, the service will run under the LocalSystem account. -
<dependencies>: Comma separated list of services that the created service depends on -
<description>: Program description -
<displayName>: Name displayed in the Windows service control panel -
<password>: Password for the user account if one is specified. -
<program>: Path to program -
<programArguments>: Arguments to pass to the program -
<serviceName>: Internal service name -
<startType>: Specify how the service should be started
Examples:
Sample Service<createWindowsService>
<abortOnError>0</abortOnError>
<displayName>Sample Service</displayName>
<program>${installdir}/sampleservice.exe</program>
<programArguments>--service</programArguments>
<serviceName>SampleService</serviceName>
<startType>auto</startType>
</createWindowsService>Created service will start automatically and run sampleservice.exe from application directory. After a service is created, it should be started using <startWindowsService> - otherwise it will be started after computer restart.
Stop Windows Service
This action allows you to stop a specified Windows service.
The allowed properties in the <stopWindowsService> action are:
-
<delay>: Amount of milliseconds to wait for the service to stop. -
<displayName>: Name displayed in the Windows service control panel -
<serviceName>: Internal service name
Examples:
Sample Service service<stopWindowsService>
<abortOnError>0</abortOnError>
<delay>15000</delay>
<displayName>Sample Service</displayName>
<serviceName>SampleService</serviceName>
</stopWindowsService>Additional Examples:
Example 1
Remove Unix Service
This action allows you to remove a service in a Linux based system. Note that you will need to run the installer as root to be able to remove services.
The allowed properties in the <removeUnixService> action are:
-
<name>: Service Name
Examples:
shortName<removeUnixService>
<name>${project.shortName}</name>
</removeUnixService>Additional Examples:
Example 1
Add Unix Service
This action allows you to create a new service in a Linux based system. Note that you will need to run the installer as root to be able to create new services.
The allowed properties in the <addUnixService> action are:
-
<description>: Product description -
<name>: Service Name -
<program>: Path to the program
Examples:
shortName<addUnixService>
<description>Sample service</description>
<name>${project.shortName}</name>
<program>${installdir}/sampleservice</program>
</addUnixService>Additional Examples:
Example 1
Start Mac OS X service
This action allows you to start a Mac OS X service. Requires Mac OS X version 10.4 or later.
The allowed properties in the <startOSXService> action are:
-
<serviceName>: Identifier for the service name
Examples:
com.installbuilder.sample<startOSXService>
<serviceName>com.installbuilder.sample</serviceName>
</startOSXService>Additional Examples:
Example 1
Get Unique Windows Service Name
This action allows you to get a unique Windows service name.
The allowed properties in the <getUniqueWindowsServiceName> action are:
-
<displayName>: Initial display name for the service -
<selectedDisplayNameVariable>: Variable to store the service display name -
<selectedServiceNameVariable>: Variable to store the Service name -
<serviceName>: Initial name for the service
Examples:
Sample Service with unique service name<getUniqueWindowsServiceName>
<displayName>Sample Service</displayName>
<selectedDisplayNameVariable>service_display_name</selectedDisplayNameVariable>
<selectedServiceNameVariable>service_name</selectedServiceNameVariable>
<separator>-</separator>
<serviceName>SampleService</serviceName>
</getUniqueWindowsServiceName>
<createWindowsService>
<abortOnError>0</abortOnError>
<displayName>${service_display_name}</displayName>
<program>${installdir}/sampleservice.exe</program>
<programArguments>--service</programArguments>
<serviceName>${service_name}</serviceName>
<startType>auto</startType>
</createWindowsService>This will allow multiple services of same base name to be created - for example if multiple applications base on same framework that runs as a service.
Additional Examples:
Example 1
Stop Mac OS X service
This action allows you to stop a Mac OS X service. Requires Mac OS X version 10.4 or later.
The allowed properties in the <stopOSXService> action are:
-
<serviceName>: Identifier for the service name
Examples:
com.installbuilder.sample<stopOSXService>
<serviceName>com.installbuilder.sample</serviceName>
</stopOSXService>Delete Windows Service
This action allows you to remove a specified Windows service.
The allowed properties in the <deleteWindowsService> action are:
-
<displayName>: Name displayed in the Windows service control panel -
<serviceName>: Internal service name
Examples:
Sample Service service<deleteWindowsService>
<abortOnError>0</abortOnError>
<displayName>Sample Service</displayName>
<serviceName>SampleService</serviceName>
</deleteWindowsService>Before deletion, service is always stopped so <stopWindowsService> does not have to be called prior to <deleteWindowsService>.
Create Mac OS X service
This action allows you to create a Mac OS X service. Requires Mac OS X version 10.4 or later. System Wide scope requires running the installer as an administrator.
The allowed properties in the <createOSXService> action are:
-
<abandonProcessGroup>: Don’t kill the remaining processes with the same group ID. -
<groupname>: Groupname -
<keepAlive>: Keep process alive by launchctl -
<program>: Path to program -
<programArguments>: Arguments to pass to the program -
<scope>: Scope of service -
<serviceName>: Identifier for the service name -
<username>: Username
Examples:
com.installbuilder.sample<createOSXService>
<keepAlive>1</keepAlive>
<program>${installdir}/Sample.app/Contents/MacOS/sample</program>
<programArguments>--service</programArguments>
<serviceName>com.installbuilder.sample</serviceName>
<scope>system</scope>
<username>daemon</username>
<groupname>wheel</groupname>
</createOSXService>New service will start automatically and run sample from application bundle.
After a service is created, it should be started using <startOSXService> - otherwise it will be started after computer restart.
Additional Examples:
Example 1
Restart Windows Service
This action allows you to restart a specified Windows service.
The allowed properties in the <restartWindowsService> action are:
-
<delay>: Amount of milliseconds to wait for the service to start / stop. -
<displayName>: Name displayed in the Windows service control panel -
<serviceName>: Internal service name
Examples:
Sample Service service<restartWindowsService>
<abortOnError>0</abortOnError>
<delay>15000</delay>
<displayName>Sample Service</displayName>
<serviceName>SampleService</serviceName>
</restartWindowsService>Additional Examples:
Example 1
Environment Actions
Remove Directory from PATH
This action allows you to remove a directory from the system PATH. For Windows, you can choose to modify the system path or the user path using the <scope> property.
The allowed properties in the <removeDirectoryFromPath> action are:
Examples:
bin subdirectory of ${installdir} from path.<removeDirectoryFromPath>
<path>${installdir}/bin</path>
</removeDirectoryFromPath>Set Environment Variable
Set the value of a system environment variable. If it does not exist yet, a new one will be created. The variable will not exist once the installer has finished.
The allowed properties in the <setEnvironmentVariable> action are:
Examples:
MYAPP_HOME environment variable to directory where application is installed.<setEnvironmentVariable>
<name>MYAPP_HOME</name>
<value>${installdir}</value>
</setEnvironmentVariable>Action <setEnvironmentVariable> only sets environment variable for this and child processes. Actions <addEnvironmentVariable and <deleteEnvironmentVariable> can be used to set a variable for current user or entire system.
Add Directory to Path
Add a directory to the system path. This will modify the registry on windows and the appropiate shell initialization files on Unix systems
The allowed properties in the <addDirectoryToPath> action are:
-
<insertAt>: Where to insert the new directory in the PATH (currently Unix only) -
<path>: Path to the directory -
<scope>: Select user path or system path.
Examples:
bin subdirectory of ${installdir} to path.<addDirectoryToPath>
<insertAt>end</insertAt>
<path>${installdir}/bin</path>
</addDirectoryToPath>Add Environment Variable
Add a system environment variable. This will modify the registry on Windows and the appropiate shell initialization files on Unix systems.
The allowed properties in the <addEnvironmentVariable> action are:
-
<name>: Environment variable name. -
<scope>: Scope. -
<username>: User to modify the environment for. If empty, the current user will be used -
<value>: Variable name
Examples:
MYAPP_HOME environment variable to directory where application is installed.<addEnvironmentVariable>
<abortOnError>0</abortOnError>
<name>MYAPP_HOME</name>
<scope>system</scope>
<showMessageOnError>0</showMessageOnError>
<value>${installdir}</value>
<onErrorActionList>
<addEnvironmentVariable>
<name>MYAPP_HOME</name>
<scope>user</scope>
<value>${installdir}</value>
</addEnvironmentVariable>
</onErrorActionList>
</addEnvironmentVariable>If setting variable as system <scope> fails, user scope is tried. If both fail, an error is thrown in the <addEnvironmentVariable> action for user <scope>.
Please note that this sets environment variable for operating system. It does not automatically set variable for current installer and its child processes. Action <setEnvironmentVariable> should be used in addition to <addEnvironmentVariable> to set the variable for current process, if it is needed.
On Windows, the optional <scope> field allows you to specify whether the environment variable should be added to the current user’s environment ("user") or globally ("system", which is the default). If adding the environment variable globally fails, it will try to add it to the current user’s environment.
Add Fonts
This action allows you to install fonts in Windows systems.
The allowed properties in the <addFonts> action are:
-
<excludeFiles>: Patterns to exclude files -
<files>: File patterns to apply action to -
<matchHiddenFiles>: Whether or not to attempt to match Windows hidden files
Examples:
<postInstallationActionList>
  <addFonts>
    <files>${installdir}/fonts/*.ttf</files>
  </addFonts>
</postInstallationActionList>
Remove Fonts
This action allows you to remove fonts on Windows. The action accepts only file names or patterns (as opposed to file paths, either relative or absolute), matching them inside the system fonts folder.
The allowed properties in the <removeFonts> action are:
-
<excludeFiles>: Patterns to exclude files -
<files>: File patterns to apply action to -
<matchHiddenFiles>: Whether or not to attempt to match Windows hidden files
Examples:
<removeFonts>
    <files>my_old_font.ttf;some_other_font.ttf;${project.shortName}*.ttf</files>
</removeFonts>
Delete Environment Variable
Delete an environment variable from the system.
The allowed properties in the <deleteEnvironmentVariable> action are:
-
<name>: Environment variable name. -
<scope>: Scope. -
<username>: User to modify the environment for. If empty, the current user will be used
Examples:
user and system <scope>.<deleteEnvironmentVariable>
<name>MYAPP_HOME</name>
<scope>system</scope>
</deleteEnvironmentVariable>
<deleteEnvironmentVariable>
<name>MYAPP_HOME</name>
<scope>user</scope>
</deleteEnvironmentVariable>Add Library to Path
Add a path in which the system will search for shared libraries on Linux
The allowed properties in the <addLibraryToPath> action are:
-
<path>: Path to add to the system search for dynamic libraries on Linux
Examples:
<addLibraryToPath>
   <path>${installdir}/libs</path>
</addLibraryToPath>
Get the current working directory
This action allows you to get the current working directory.
The allowed properties in the <pwd> action are:
-
<variable>: Variable to which to save the current working directory.
Examples:
<pwd>
    <variable>current_working_directory</variable>
</pwd>
File System Actions
Copy File
Create a copy of a file or directory. The destination file or directory will be overwritten if it already exists
The allowed properties in the <copyFile> action are:
-
<destination>: Path to where the file will be copied. -
<excludeFiles>: Patterns to exclude files -
<matchHiddenFiles>: Whether or not to attempt to match Windows hidden files -
<origin>: Path to the original file.
Examples:
<copyFile>
   <destination>~/Desktop</destination>
   <origin>${installdir}/Launch Application.desktop</origin>
   <ruleList>
      <platformTest type="unix"/>
   </ruleList>
</copyFile><copyFile>
<origin>${installdir}/bin/*</origin>
<destination>${installdir}/backup/</destination>
<excludeFiles>*subfolder1; *subfolder3</excludeFiles>
</copyFile>Unpack Directory
This action allows you to unpack a directory before files are unpacked during the installation phase. This can be helpful to extract a full directory to a temporary folder such as ${env(TEMP)}. If you need to unpack single files, you may want to try using <unpackFile> action instead.
The allowed properties in the <unpackDirectory> action are:
-
<addToUninstaller>: If enabled, adds unpacked objects to uninstaller so they are removed during uninstallation -
<component>: Project component where the directory you want to extract is located. -
<destination>: Path to the location where you want to extract the directory. -
<folder>: Project folder name where the directory you want to extract is located. -
<origin>: Directory name you want to extract.
Examples:
<unpackDirectory>
    <component>initialdata</component>
    <destination>${installdir}/data</destination>
    <folder>data</folder>
    <origin>data</origin>
    <ruleList>
        <fileTest>
            <condition>not_exists</condition>
            <path>${installdir}/data</path>
        </fileTest>
    </ruleList>
</unpackDirectory>Delete File
Delete a file or directory (including its contents). The action does not throw an error if deleting a file or directory failed.
The allowed properties in the <deleteFile> action are:
-
<excludeFiles>: Patterns to exclude files -
<matchHiddenFiles>: Whether or not to attempt to match Windows hidden files -
<path>: Path to the file or directory to delete. It accepts patterns
Examples:
The deleteFile action can delete both files and directories, even if they are not empty.
<deleteFile>
  <path>/path/to/file</path>
</deleteFile>
Patterns can be used too.
<deleteFile>
  <path>/path/to/directory/*.txt</path>
</deleteFile><deleteFile>
<path>/path/to/directory/</path>
</deleteFile>Sometimes you want to be sure a directory is empty before deleting.
<deleteFile>
  <path>${installer_directory}</path>
  <ruleList>
    <fileTest condition="is_empty" path="${installer_directory}"/>
  </ruleList>
</deleteFile>
<throwError>
  <text>Unable to delete installer directory</text>
  <ruleList>
    <fileTest condition="exists" path="${installer_directory}"/>
  </ruleList>
</throwError>Create Backup File
Create a backup of a file or directory. The backup will be named with a .bak extension if no destination is specified. If a backup file already exists, new backups will be named .bak1, .bak2 and so on.
The allowed properties in the <createBackupFile> action are:
-
<destination>: Path to the destination backup folder. -
<path>: Path to original file you wish to backup.
Examples:
<createBackupFile>
    <destination>${installdir}/backup/</destination>
    <path>${installdir}/apache2/conf/httpd.conf</path>
</createBackupFile>
The backup file will be stored in a folder named backup. If a <destination> is not specified the destination filename will be autogenerated and the backup file will be stored in the same folder as the original file.
Additional Examples:
Example 1
Create Directory
This action allows you to create a new directory.
The allowed properties in the <createDirectory> action are:
-
<path>: Path to the new directory
Examples:
<createDirectory>
    <path>/opt/src</path>
</createDirectory>
If the directory already exists the action won’t have any effect so it is not needed to attach a rule checking the existence.
Unzip
This action allows you to uncompress the whole content of a zip file to a given destination folder. The file to unzip must be already present on the file system, i.e., it doesn’t support unzipping files that are shipped by the installer but which have not been already unpacked (you may want to use the <unpackFile> action in that case).
The allowed properties in the <unzip> action are:
-
<addToUninstaller>: If enabled, adds unpacked objects to uninstaller so they are removed during uninstallation -
<destinationDirectory>: Path to the folder where you want the file content to be extracted. The folder must exist and must be writable -
<zipFile>: ZIP file that will be uncompressed
Examples:
<unzip>
    <destinationDirectory>${installdir}/applications</destinationDirectory>
    <zipFile>${installdir}/myApplication.app.zip</zipFile>
</unzip>
The <unzip> action is not intended to support very large files. For these we recommend either to uncompress the zip file before building and include the contents of the unpacked archive in the installer - as InstallBuilder includes zip compression as well as more efficient compression algorithms - or to bundle an external decompression tool and call it at runtime using the <runProgram> action.
Additional Examples:
Example 1
Touch File
Update the access and modification times of a file or directory. If the file does not exist, it can be specified whether to create an empty file or not. It is equivalent to the touch Unix command.
The allowed properties in the <touchFile> action are:
-
<createIfNotExists>: Whether or not to create the file in case it does not exist -
<matchHiddenFiles>: Whether or not to attempt to match Windows hidden files -
<path>: Path to the file/directory to be touched
Examples:
<touchFile>
    <createIfNotExists>1</createIfNotExists>
    <path>${installdir}/components/documentationComponent</path>
    <ruleList>
       <isTrue value="${project.component(documentationComponent).selected}"/>
    </ruleList>
</touchFile>
Additional Examples:
Example 1
Get Symbolic Link target
Get the destination path referenced by the given symbolic link. Returns an empty value if the file doesn’t exist or is not a symbolic link.
The allowed properties in the <getSymLinkTarget> action are:
-
<link>: Symbolic link path -
<variable>: Variable to store result
Examples:
libsample.so in application directory<getSymLinkTarget>
<link>${installdir}/libsample.so</link>
<variable>lib_path</variable>
</getSymLinkTarget>This will store target path in lib_path variable. Note that if the path is not absolute, it is relative to directory where <link> is located.
Rename File
Change the name of a file or directory
The allowed properties in the <renameFile> action are:
-
<destination>: New name of the file. -
<excludeFiles>: Patterns to exclude files -
<matchHiddenFiles>: Whether or not to attempt to match Windows hidden files -
<origin>: Original name of the file.
Examples:
<deleteFile>
    <path>${installdir}/config.ini.bak</path>
</deleteFile>
<renameFile>
    <destination>${installdir}/config.ini.bak</destination>
    <origin>${installdir}/config.ini</origin>
</renameFile>Create Symbolic Link
Create a symbolic link to a file. It is the equivalent to the Unix ln command.
The allowed properties in the <createSymLink> action are:
-
<linkName>: Symbolic link name. -
<target>: Path to the file to which you want to create a symbolic link.
Examples:
libsample.so pointing to libsample.so.1 in application directory<createSymLink>
<linkName>${installdir}/libsample.so</linkName>
<target>libsample.so.1</target>
</createSymLink>This will create a symbolic link in application’s directory. Note that <target> is relative to directory where <linkName> will be created.
Zip
Pack one or more files to a zip file, relative to base directory.
The allowed properties in the <zip> action are:
-
<baseDirectory>: Directory that all files will be packed relatively to -
<excludeFiles>: Patterns to exclude files -
<files>: File patterns to apply action to -
<matchHiddenFiles>: Whether or not to attempt to match Windows hidden files -
<zipFile>: ZIP file that will be created
Examples:
.DS_Store directories<zip>
<baseDirectory>${installdir}</baseDirectory>
<files>${installdir}/backup</files>
<excludeFiles>*/.DS_Store</excludeFiles>
<zipFile>${installdir}/backup.zip</zipFile>
</zip>As the <baseDirectory> is set to ${installdir}, the packed files will be relative to it. For example, the file /home/user/sample-1.0/backup/README.txt will be stored in the zip file as backup/README.txt.
Additional Examples:
Example 1
Create Shortcuts
Creates one or more shortcuts in specified location.
The allowed properties in the <createShortcuts> action are:
-
<destination>: Path to the location where you want to create the shortcuts. -
<shortcutList>: List of shortcuts to create.
Examples:
<createShortcuts>
    <destination>${windows_folder_common_programs}/${project.startMenuGroupName}</destination>
    <ruleList>
        <isTrue value="${windows_os_uac_enabled}"/>
    </ruleList>
    <shortcutList>
        <shortcut>
            <comment>Text that will appear on Tooltip</comment>
            <name>Run administrative panel</name>
            <runAsAdmin>1</runAsAdmin>
            <windowsExec>${installdir}/admin.exe</windowsExec>
            <windowsExecArgs></windowsExecArgs>
            <windowsPath>${installdir}</windowsPath>
        </shortcut>
    </shortcutList>
</createShortcuts>Unpack File
This action allows you to unpack a file before files are unpacked during the installation phase. This can be helpful to extract files to a temporary folder such as ${env(TEMP)} if you need to run a pre-installation check script or program. If you need to unpack a directory, you may want to try using <unpackDirectory> action instead.
The allowed properties in the <unpackFile> action are:
-
<addToUninstaller>: If enabled, adds unpacked objects to uninstaller so they are removed during uninstallation -
<component>: Project component where the file you want to extract is located -
<destination>: Path to the location where you want to extract the file -
<folder>: Project folder name where where the file you want to extract is located -
<origin>: File name you want to extract
Examples:
<unpackFile>
    <component>initialdata</component>
    <destination>${installdir}/config.ini</destination>
    <folder>data</folder>
    <origin>config.ini</origin>
    <ruleList>
        <fileTest>
            <condition>not_exists</condition>
            <path>${installdir}/config.ini</path>
        </fileTest>
    </ruleList>
</unpackFile>Get File Or Directory Information
Gets Information About File Or Directory
The allowed properties in the <getFileInfo> action are:
-
<followSymLinks>: Whether or not to follow or not symbolic links -
<path>: Path -
<type>: Type of information to retrieve -
<variable>: Variable to store result in
Examples:
<getFileInfo>
    <path>${installdir}/database.db</path>
    <type>size</type>
    <variable>size</variable>
</getFileInfo>
This will store size of database.db file in installation directory to variable size.
System Actions
Kill Process
This action allows you to kill a running process that matches one or several conditions. Windows support only.
The allowed properties in the <kill> action are:
Examples:
<kill>
  <name>SampleBinary.exe</name>
</kill><kill>
<path>${filePath.dos}</path>
</kill><kill>
<name>SampleBinary.exe</name>
<path>${filePath.dos}</path>
<pid>35025</pid>
</kill>Locate Binary
Based on command given, locates binary and creates command that needs to be run.
The allowed properties in the <locate> action are:
-
<command>: Command to locate -
<variable>: Variable to store the result in
Examples:
python binary and find Python’s installation directory.<locate>
<command>python</command>
<variable>python_bin</variable>
</locate>
<!-- get directory name for binary (i.e. /opt/ActivePython-2.5/bin) -->
<dirName>
<variable>python_parentdir</variable>
<path>${python_binary}</path>
</dirName>
<!-- get Python home (i.e. /opt/ActivePython-2.5) -->
<dirName>
<variable>python_home</variable>
<path>${python_parentdir}</path>
</dirName>First python binary is located using PATH environment variable and registry on Windows, next binary name as well as parent directory name is stripped - so that /opt/ActivePython-2.5/bin/python is mapped to /opt/ActivePython-2.5.
The locate command may return the relative path of the binary. In some cases it can be useful to combine it with the <PathManipulation> action to get the full path of the binary
<preUninstallationActionList>
...
<locate>
<command>msiexec.exe</command>
<variable>command</variable>
</locate>
...
<pathManipulation>
<action>absolutize</action>
<path>${command}</path>
<variable>command</variable>
</pathManipulation>
...
<runProgram>
<program>${command}</program>
<programArguments>/X ${app_uninstaller} /qn /norestart</programArguments>
</runProgram>
...
</preUninstallationActionList>Directory Name
Returns a name comprised of all of the path components in name excluding the last element. If name is a relative file name and only contains one path element, then returns ".". If name refers to a root directory, then the root directory is returned.
The allowed properties in the <dirName> action are:
-
<path>: The path from which the base directory will be retrieved. -
<variable>: Variable that will store the directory path.
Examples:
/opt or C:\Program Files<dirName>
<variable>installation_parent</variable>
<path>${installdir}</path>
</dirName>Create Timestamp
This action allows you to create a timestamp using a custom format, storing the result in an installer variable.
The allowed properties in the <createTimeStamp> action are:
-
<format>: Format string for the generated timestamp. The string allows a number of field descriptors. -
<variable>: Variable that will store the resulting timestamp.
The <format> tag should contain one or more following fields, which will be replaced using current date and time:
-
%a: short name of the day of the week. e.g.: Thu -
%A: full name of the day of the week. e.g.: Thursday -
%b: short name of the month. e.g.: Apr -
%B: full name of the month. e.g.: April -
%c: localized representation of date and time of day. e.g.: Thu Apr 07 17:23:00 2011 -
%d: number of the day of the month, as two decimal digits. e.g.: 07 -
%e: number of the day of the month, as one or two decimal digits. e.g.: 7 -
%h: same as%b -
%H: number giving the hour of the day in 24-hour clock format, as two decimal digits. e.g.: 17 -
%I: number giving the hour of the day in 12-hour clock format, as two decimal digits. e.g.: 05 -
%k: number giving the hour of the day in 24-hour clock format, as one or two decimal digits. e.g.: 17 -
%l: number giving the hour of the day in 12-hour clock format, as one or two decimal digits. e.g.: 5 -
%m: number of the month, as two decimal digits. e.g.: 04 -
%M: number of the minute of the hour (00-59), as two decimal digits. e.g.: 23 -
%N: number of the month, as one (preceeded with a space) or two decimal digits. e.g.: 4 -
%p: AM/PM indicator. e.g.: PM -
%R: same as%H:%M -
%s: count of seconds since the epoch, expressed as decimal integer. e.g.: 1302189780 -
%S: number of the seconds in the minute (00-59), as two decimal digits. e.g.: 00 -
%T: same as%H:%M:%S -
%u: weekday number (Monday = 1, Sunday = 7). e.g.: 4 -
%U: week of the year (00-52), Sunday is the first day of the week. e.g.: 14 -
%V: week of the year according to ISO-8601 rules. Week 1 is week containing January 4th. e.g. 14 -
%w: weekday number (Sunday = 0, Saturday = 6). e.g.: 4 -
%W: week of the year (00-52), Monday is the first day of the week. e.g.: 14 -
%y: year without century (00-99). e.g. 11 -
%Y: year with century. e.g. 2011
Examples:
<createTimeStamp>
<format>%Y%m%d%H%M%S</format>
<variable>timestamp</variable>
</createTimeStamp>
<iniFileSet>
<file>${installdir}/version.ini</file>
<key>timestamp</key>
<section>Version</section>
<value>${timestamp}</value>
</iniFileSet>Find File
This action allows you to define a file name or pattern (eg. "*.txt") to be searched inside a given directory and all its subdirectories. It will save in the specified installer variable the full path to the first file that matches the provided file name or pattern.
The allowed properties in the <findFile> action are:
-
<baseDirectory>: Path to the directory in which to search for the file. It will search inside the directory and all of its subdirectories. -
<followSymLinks>: Whether or not to follow or not symbolic links -
<pattern>: Pattern for the file that will be searched. The pattern can contain wildcards (*,?). -
<variable>: Variable where the full path to the first matching file will be stored
Examples:
<findFile>
<baseDirectory>/Applications</baseDirectory>
<pattern>myapp-info.ini</pattern>
<variable>installationInfo</variable>
<ruleList>
<platformTest type="osx"/>
</ruleList>
</findFile>Get Free Disk Space
Calculate the free disk (KiloBytes) space and save the value in the given variable. Returns -1 if free space cannot be determined.
The allowed properties in the <getFreeDiskSpace> action are:
-
<path>: Path to the folder or disk -
<units>: Size units for the returned value. -
<variable>: Variable to which to save the result of the calculation
Examples:
<directoryParameter>
<name>installdir</name>
<validationActionList>
<getFreeDiskSpace path="${installdir}" units="KB" variable="diskSpace"/>
<throwError>
<text>You don't have enough disk space to install
${project.component(bigComponent).description}</text>
<ruleList>
<compareValues>
<value1>${required_diskspace}</value1>
<logic>greater</logic>
<value2>${diskSpace}</value2>
</compareValues>
</ruleList>
</throwError>
</validationActionList>
</directoryParameter>Additional Examples:
Example 1
Get Total Disk Space
Get the total disk (KiloBytes) space and save the value in the given variable. Returns -1 if total space cannot be determined.
The allowed properties in the <getTotalDiskSpace> action are:
-
<path>: Path to the folder or disk -
<units>: Size units for the returned value. -
<variable>: Variable to which to save the result of the calculation
Examples:
<directoryParameter>
<name>installdir</name>
<validationActionList>
<getTotalDiskSpace path="${installdir}" units="MB" variable="diskSpace"/>
<showWarning>
<text>The application should be installed on disk larger than 1TB for optimal performance</text>
<ruleList>
<compareValues>
<value1>1024</value1>
<logic>greater</logic>
<value2>${diskSpace}</value2>
</compareValues>
</ruleList>
</showWarning>
</validationActionList>
</directoryParameter>Get Available Port
Returns the number of the first available port in a range of port numbers specified by initialPort and finalPort (both inclusive).
The allowed properties in the <getFreePort> action are:
-
<finalPort>: The final port number on the range (inclusive). -
<initialPort>: The initial port number on the range (inclusive). -
<variable>: Variable that will store the free port number.
Examples:
<getFreePort>
<finalPort>8999</finalPort>
<initialPort>8080</initialPort>
<variable>http_port</variable>
</getFreePort>
<iniFileSet>
<file>${installdir}/www.ini</file>
<key>Port</key>
<section>Listen</section>
<value>${http_port}</value>
</iniFileSet>Get Name Of Process Using Port
Gets Name Of Process Using Specified Port
The allowed properties in the <getProcessUsingPort> action are:
-
<pidVariable>: Variable to use for storing id of the process using the port -
<port>: TCP port to check -
<variable>: Variable to use for storing name of the process using the port
Examples:
Validate port parameter and show appropriate message if it is in use, using the process name if it can be retrieved.
<validationActionList>
<if>
<actionList>
<getProcessUsingPort>
<port>${port}</port>
<variable>port_process_name</variable>
</getProcessUsingPort>
<if>
<actionList>
<throwError>
<text>Port ${port} is in use by ${port_process_name}</text>
</throwError>
</actionList>
<conditionRuleList>
<compareTextLength>
<length>0</length>
<logic>does_not_equal</logic>
<text>${port_process_name}</text>
</compareTextLength>
</conditionRuleList>
<elseActionList>
<throwError>
<text>Port ${port} is in use</text>
</throwError>
</elseActionList>
</if>
</actionList>
<conditionRuleList>
<portTest>
<condition>cannot_bind</condition>
<port>${port}</port>
</portTest>
</conditionRuleList>
</if>
</validationActionList>Desktop Session Startup
Adds a program to be executed whenever a window manager session starts (only Linux KDE/Gnome supported).
The allowed properties in the <addUnixDesktopStartUpItem> action are:
-
<description>: The description of the program. -
<name>: The name of this startup item. -
<program>: Path to the program to be executed when the session starts. -
<programArguments>: Arguments to be considered when running the program (only available for GNOME). -
<username>: User to add the Startup item for. If empty, the current user will be used
Examples:
myapp-client application<addUnixDesktopStartUpItem>
<description>Client for managing myapp</description>
<name>myapp-client</name>
<program>${installdir}/myapp-client</program>
<programArguments>--dock</programArguments>
</addUnixDesktopStartUpItem>To get a similar behavior on Windows you just need to write a shortcut to the desired application to launch in the folder ${windows_folder_startup}:
<createShortcuts>
<destination>${windows_folder_startup}/</destination>
<shortcutList>
<shortcut>
<comment>Client for managing myapp</comment>
<name>Launch myapp client</name>
<runAsAdmin>1</runAsAdmin>
<windowsExec>${installdir}/myapp-client.exe</windowsExec>
<windowsExecArgs>--dock</windowsExecArgs>
<windowsPath>${installdir}</windowsPath>
</shortcut>
</shortcutList>
</createShortcuts>Run Program
Run a program or script
The allowed properties in the <runProgram> action are:
-
<program>: Path to program or script to run -
<programArguments>: Program arguments -
<runAs>: Run the program or script as a specific user id. It will only take effect on Unix system and when running the installer as root -
<runAsShell>: When configuring the runAs property, shell used to run the program. (not supported on OS X) -
<stdin>: Text to send to program’s standard input. -
<useMSDOSPath>: Whether or not to use or not MSDOS program name path on Windows -
<workingDirectory>: Working directory. This is important for scripts that expect to be run from a specific location. By default, it will be the directory where the script or program is located
Examples:
<runProgram>
<program>${installdir}/bin/${project.shortName}.run</program>
<programArguments>--showWelcome 1 &</programArguments>
<workingDirectory>${installdir}/bin</workingDirectory>
</runProgram>By default, programs executed are launched by their 8.3 names. InstallBuilder does that to avoid issues handling special characters like spaces. If you need your installer to be launched using the full name, for example to have an exact path to look when checking if the process is running, you can disable it setting <useMSDOSPath> to 0. This setting is ignored when executing commands in platforms other than Windows.
<runProgram>
<program>${installdir}/bin/myApp.exe</program>
<useMSDOSPath>0</useMSDOSPath>
</runProgram>In Unix platforms, when running the installer as root, it is also possible to specify the user that will be used to execute the command:
<runProgram>
<program>${installdir}/bin/mysql</program>
<runAs>mysql</runAs>
</runProgram>If the installer is executed as a regular user in GUI mode, and gksu (Gnome command) or kdesu (KDE command) are in the path, they will be used to graphically require a password to raise privileges. Please note that this won’t work on OS X.
<runProgram>
<program>${installdir}/bin/mysql</program>
<runAs>mysql</runAs>
<runAsShell>/bin/bash</runAsShell>
</runProgram>This property will only take into account when using <runAs>.
Wait For Port
Pause the installation for a maximum timeout until a server process is listening in the specified port
The allowed properties in the <waitForPort> action are:
Examples:
<runProgram>
<program>${installdir}/ctlscript.sh</program>
<programArguments>stop mysql &</programArguments>
</runProgram>
<waitForPort>
<port>${mysql_port}</port>
<state>free</state>
<timeout>30</timeout>
</waitForPort>
<logMessage text="MySQL Stopped"/>Path manipulation
Performs change on the path and returns it in variable
The allowed properties in the <pathManipulation> action are:
-
<action>: Action to perform on the path -
<path>: The path to manipulate -
<variable>: Variable that will store the new path.
Examples:
${datadir}<pathManipulation>
<action>absolutize</action>
<path>${datadir}</path>
<variable>datadir</variable>
</pathManipulation>Get Disk Usage
Calculate the disk usage (KiloBytes) for a file or set of files, and save the value in the given variable.
The allowed properties in the <getDiskUsage> action are:
-
<excludeFiles>: Patterns to exclude files -
<files>: File patterns to apply action to -
<matchHiddenFiles>: Whether or not to attempt to match Windows hidden files -
<units>: Size units for the returned value. -
<variable>: Variable to which to save the result of the calculation
Examples:
<preBuildActionList>
...
<getDiskUsage>
<files>${build_project_directory}/builds</files>
<units>MB</units>
<variable>applicationSize</variable>
</getDiskUsage>
...
</preBuildActionList>User and Group Actions
Change File Permissions
Change permissions of a file or directory
The allowed properties in the <changePermissions> action are:
-
<excludeFiles>: Patterns to exclude files -
<files>: File patterns to apply action to -
<permissions>: Permissions to set to file or directory
Examples:
<changePermissions>
<files>${installdir}/documentation</files>
<permissions>555</permissions>
</changePermissions>Get File Permissions
Get permissions of a file or directory
The allowed properties in the <getPermissions> action are:
-
<file>: File or directory to retrieve permissions -
<variable>: Variable name to save permissions
Examples:
<getPermissions>
<file>~${user}/.MacOSX/environment.plist</file>
<variable>permissions</variable>
</getPermissions>
<runProgram>
<program>defaults</program>
<programArguments>write ~${user}/.MacOSX/environment foo -string bar</programArguments>
</runProgram>
<changePermissions>
<files>~${user}/.MacOSX/environment.plist</files>
<permissions>${permissions}</permissions>
</changePermissions>Add User
Add a user to the system.
The allowed properties in the <addUser> action are:
-
<homedir>: Path to the users homedir -
<password>: Password for the user account. -
<username>: Username to add to the system
Examples:
mysql user<postInstallationActionList>
<addUser>
<abortOnError>0</abortOnError>
<showMessageOnError>0</showMessageOnError>
<username>mysql</username>
</addUser>
</postInstallationActionList>Additional Examples:
Example 1
Delete User
Delete a user from the system. Equivalent to the Unix userdel command
The allowed properties in the <deleteUser> action are:
-
<username>: Username
Examples:
mysql user<postUninstallationActionList>
<deleteUser>
<abortOnError>0</abortOnError>
<showMessageOnError>0</showMessageOnError>
<username>mysql</username>
</deleteUser>
</postUninstallationActionList>Add Group
Add a group to the system. Equal to the Unix groupadd command
The allowed properties in the <addGroup> action are:
-
<groupname>: Group to add to the system
Examples:
mysql group<postInstallationActionList>
<addGroup>
<abortOnError>0</abortOnError>
<groupname>mysql</groupname>
<showMessageOnError>0</showMessageOnError>
</addGroup>
</postInstallationActionList>Additional Examples:
Example 1
Delete Group
This action allows you to remove a group from the system.
The allowed properties in the <deleteGroup> action are:
-
<groupname>: Group name to delete.
Examples:
mysql group<postUninstallationActionList>
<deleteGroup>
<abortOnError>0</abortOnError>
<groupname>mysql</groupname>
<showMessageOnError>0</showMessageOnError>
</deleteGroup>
</postUninstallationActionList>Add Group To User
Add a supplementary group to a user. This way, the user is also member of that group. Make sure that the group already exists. If no username is given, then the current logged on user is selected.
The allowed properties in the <addGroupToUser> action are:
-
<groupname>: Groupname -
<username>: Username
Examples:
mysql group to mysql user<postInstallationActionList>
<addGroupToUser>
<groupname>mysql</groupname>
<username>mysql</username>
</addGroupToUser>
</postInstallationActionList>Delete Group from User
Delete a supplementary group from a user.
The allowed properties in the <deleteGroupFromUser> action are:
-
<groupname>: Groupname -
<username>: Username
Examples:
<postUninstallationActionList>
<deleteGroupFromUser>
<groupname>myappusers</groupname>
<username>${system_username}</username>
</deleteGroupFromUser>
</postUninstallationActionList>Change Owner And Group
Change the owner and group of a file or directory
The allowed properties in the <changeOwnerAndGroup> action are:
-
<excludeFiles>: Patterns to exclude files -
<files>: File patterns to apply action to -
<group>: Group to set to file or directory -
<owner>: Owner to set to file or directory
Examples:
<changeOwnerAndGroup>
<files>${installdir}/postgresql/data</files>
<group>postgres</group>
<owner>postgres</owner>
</changeOwnerAndGroup>Add Rights to Account
Add rights to user or group on Windows
The allowed properties in the <addWindowsAccountRights> action are:
-
<account>: User or group name -
<rights>: Account rights, separated by spaces; Example value: SeServiceLogonRight. A complete list can be obtained from http://msdn.microsoft.com/en-us/library/aa375728(v=VS.85).aspx
Examples:
<addWindowsAccountRights>
<abortOnError>0</abortOnError>
<showMessageOnError>0</showMessageOnError>
<account>${postgres_account}</account>
<rights>SeServiceLogonRight</rights>
<ruleList>
<windowsAccountTest>
<account>${postgres_account}</account>
<rights>SeServiceLogonPrivilege</rights>
<negate>1</negate>
</windowsAccountTest>
</ruleList>
</addWindowsAccountRights>Remove Rights from Account
Remove rights from user or group on Windows
The allowed properties in the <removeWindowsAccountRights> action are:
-
<account>: User or group name -
<rights>: Account rights, separated by spaces; Example value: SeServiceLogonRight. A complete list can be obtained from http://msdn.microsoft.com/en-us/library/aa375728(v=VS.85).aspx
Examples:
<removeWindowsAccountRights>
<abortOnError>0</abortOnError>
<showMessageOnError>0</showMessageOnError>
<account>${account}</account>
<rights>SeBatchLogonRight SeInteractiveLogonRight</rights>
</removeWindowsAccountRights>